
2. Installation
Popular Linux distros
Linux installation steps
Ubuntu software packages (DEB packaging)
KVM virtualization
Virtual machine (VM) setup
Ubuntu installation on a VM
2.1. Some popular Linux distributions
Ubuntu Debian Mint Red Hat CentOS Scientific Linux Fedora SuSe
Their main difference is in the installation way of the OS components and software, which is called a package management.
See them on distrowatch in the right colomn
2.2. Ubuntu distributions
Available Ubuntu Releases (Links to an external site.).
20.10, 20.04 LTS, 18.04 LTS, 16.04 LTS – The Ubuntu version numbering scheme is based on the date of the release of the distribution, October 2020, April 2020, April 2018, etc
18.04 LTS (Links to an external site.) – The LTS means long-term support (5 years). (Links to an external site.) The interim production releases are supported for 9 months.
Release – Server and Desktop editions. They have similar packages. The server may have no X-desktop environment installed.
To check what version of Ubuntu is running on your system run command: cat /etc/lsb-release Supported architectures – x86, ARM (32 bit), x86_64, amd64 (64 bit).
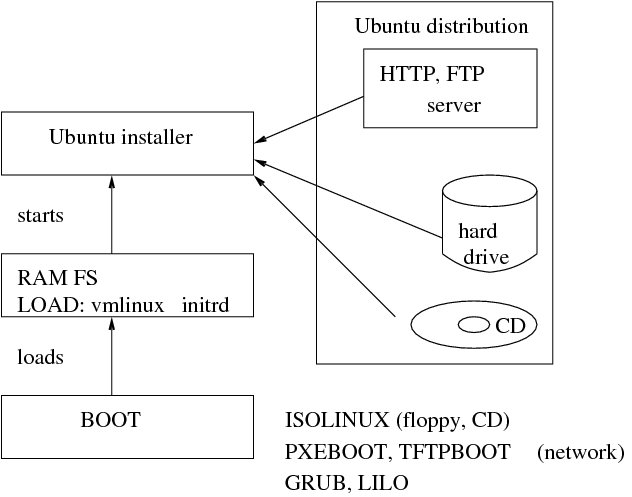
2.3. Installation steps, media, files.
Installation Steps:
Boot-up
Ubuntu-installer (Debian-installer)
Post-install base configuration
Installation boot media:
CD-ROM/DVD-ROM, ISO files.
Hard Disk
USB Memory Stick
Network
bootstrap from Unix system
The installation files/packages can be located on:
Local CD-ROM/DVD-ROM
Local Hard Disk
Remote server (HTTP, FTP, NFS)
Note: we will be installing Ubuntu on a virtual host by using a remote HTTP server (Ubuntu mirror) and an ISO file on a Hard Drive.
2.4. Boot up and installation
2.5. Ubuntu installer stages
Hardware detection
Check available RAM
Language Chooser
Country Chooser
Choosing a Keyboard
Configuring Network
Choosing Ubuntu mirror
Downloading the Ubuntu Installer components
Partitioning Disks
Configuring Logical Volume Manager and RAID
Configuring Time Zone
Configuring the Clock
Setting Up Users And Passwords
Base System Installation
Installing Additional Software
Install the Grub Boot Loader on a Hard Disk
Finish the Installation and Reboot
Alt-F* keys
Check error messages Left Alt-F4
Get shell prompt Left Alt-F2
Go back to the installer Left Alt-F1
The error messages are logged in /var/log/syslog. After installation, this log is copied to /var/log/installer/syslog on the new system.
2.6. Disk partitioning in Linux
There are two types of drive partitioning schemes on a PC based x86_64 architecture: MBR (Master Boot Record), and GPT (GUID Partition Table).
In MBR (also known as DOS or MS-DOS partition table), there are maximum 4 primary partitions on a hard drive.
/dev/sda1
/dev/sda2
/dev/sda3
/dev/sda4
One of them can be of “extended” type and doesn’t contain a file system, but can contain logical partitions. Say,
/dev/sda1 - primary
/dev/sda2 - extended
/dev/sda5 - logical
/dev/sda6 - logical
/dev/sda7 - logical
Max number of logical partitions is 12. Their sequence number can not be skipped, unlike that for the primary partitions.
The major limitation in MBR is 2TB drive limit.
GUID Partition Table (GPT) was designed by Intel to fit into the Unified Extensible Firmware Interface (UEFI) specification, which becomes the old BIOS replacement. GPT can handle disks of 8 zebibytes, or 8.6 billion TiB capacity. It has many superior features.
fdisk, cfdisk, gdisk, and parted can be used for partitioning a drive.
File systems can be created with mkfs command
mkfs -t ext4 /dev/sda1
To create a swap partition, use mkswap
mkswap /dev/sda5
References:
Partitioning (Links to an external site.)
Make the most of large drives with GPT and Linux
2.7. Disk partitioning for OS installation
Minimum required number of partitions on Linux is 2: / and swap (starting from Ubuntu 18.04 swap it can be a file in the root file system)
For Desktops it is recommended at least 3: /, swap, /home
For Multi-user workstation – at least 6: /, /home, /usr, /var, /tmp, swap
Partitioning scheme Minimum space
Installation type |
Suggested partitions |
|---|---|
All files in one partition 600MB |
/, swap |
Desktop machine 1.7GB |
/, /home, swap |
Multi-user workstation 1.7GB + |
/, /home, /usr, /var, /tmp, swap |
Linux generic partition types: swap, ext2, ext3, ext4 Additional supported types: Raiser FS, jfs, xfs, zfs
2.8. Ubuntu packages
Ubuntu OS components and most of the GNU software are available in form of packages. A package file contains:
Software
Info (control) file
Scripts (pre/post install/remove)
Naming convention:
(package-name)_(source version)-(package-version)_(architecture).deb
For example:
g++-7_7.3.0-27ubuntu1~18.04_amd64.deb
Package name is g+±7. The source version is 7.3.0 of GNU C++ 7 series, package version (revision): 27 - debian and 1~18.04 -ubuntu, architecture: amd64.
The official Ubuntu distribution located in the Ubuntu archive,
folders main and Restricted.
In folder Restricted, there are packages with restricted vendor licensing, for example, nvidia-361.
Universe: Free software available from the network, but not officialy maintained by Ubuntu development team. For example, a2ps (“Anything to PS”), xemacs21. No guarantee of security fixes and support.
Multiverse: Packages in the archive have some onerous license condition restricting use or redistribution of the software. For example, dvd-slideshow.
You can run synaptic package manager to see what package belongs to what folder:
sudo -s
synaptic
Click on Origin to see the folders in the top left window and their packages in the top right one.
Reference: Ubuntu Repositories
2.9. Package management (dpkg)
Installation:
dpkg -i linux-image-4.15.0-43-generic_4.15.0-43_amd64.deb
Removal:
dpkg --purge linux-image-4.15.0-43-generic_4.15.0-43_amd64.deb
queries (list of all packages):
dpkg -l '*'
dpkg -l '*kernel*'
List files in the package:
dpkg -L ncurses-term
Info on a package:
dpkg -s ncurses-term
To find out what package owns the file:
dpkg -S ncurses-term
2.10. Advanced Package Tool (APT)
Configuration of /etc/apt/sources.list file in our class
|
deb http://us.archive.ubuntu.com/ubuntu/ bionic main restricted deb http://us.archive.ubuntu.com/ubuntu/ bionic universe deb http://us.archive.ubuntu.com/ubuntu/ bionic multiverse deb http://us.archive.ubuntu.com/ubuntu/ bionic-updates universe main multiverse restricted deb http://us.archive.ubuntu.com/ubuntu/ bionic-backports universe main multiverse restricted deb http://security.ubuntu.com/ubuntu/ bionic-security universe main multiverse restricted |
After updating config files and periodically, run
apt-get update
Upgrade packages
apt-get upgrade
Search for string in known packages
apt-cache search ncurses
apt-cache search --names-only ncurses
Install a package
apt-get install libcurses-perl
Check if a package has been installed and can be updated
apt-cache policy libcurses-perl
Clean the cached deb packages after installations
apt-get autoclean
More instructions on APT are available in APT manual
2.11. APT enhancements
Aptitude is a menu-driven, text-based front-end to the Advanced Packaging Tool (APT) system.
Synaptic is a graphical package management front-end for APT. It provides the same features as the apt-get command line utility with a GUI front-end based on Gtk+.
Tasksel ia a tool for selecting installation of a group of packages for specific tasks. For example, DNS, SMTP, etc.
2.12. Automatic Ubuntu Installation Overview
Preconfiguration file method preseeding

Installation answers are stored in preseed.cfg file.
File preseed.cfg can be stored on URL, CD, HD, floppy.
Limitations by preseed.cfg config options.
Only one HD can be partitioned.
PXE boot, then restores from archived image on an NFS server.
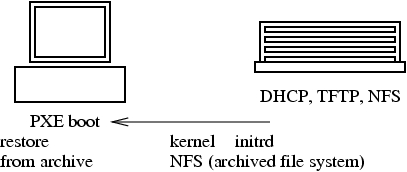
Install OS then archive it (tar-gzip) onto NFS server.
PXE boot: gets IP from a DHCP, kernel and initrd from a TFTP server.
Partitions disks, mounts NFS, then restores the file system from the archive.
No need for Ubuntu mirror.
Needs custom initrd.
The OS may not be up-to-date after the installation.
Fully Automatic Installation FAI
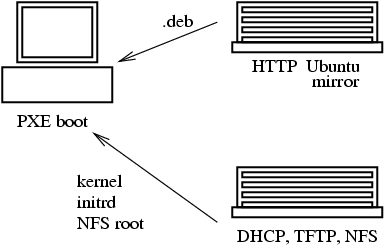
Configure the installer root on the NFS server.
PXE boot: gets IP from a DHCP, kernel and initrd from a TFTP server.
Mounts the installer root from the NFS server.
Very customizable installation classes.
The installed OS is up-to date.
Takes time to learn FAI.
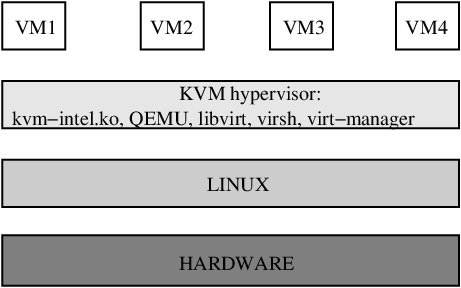
2.13. Purpose of Virtualization
In computing, a virtualization is the facility that allows multiple operating systems (VMs) to run simultaneously on a computer in a safe and efficient manner.
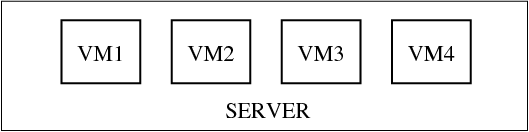
Virtualization purposes:
Application development and testing on a separate system,
Server consolidation on one platform,
Virtual appliances (download a VM applience for specific application or service)
Prototyping and setting VMs to run on a remote server or/and cloud.
Multiple Operating systems on a desktop.
2.14. Virtualization with KVM
KVM (for Kernel-based Virtual Machine) is a full virtualization solution for Linux on x86 hardware containing virtualization extensions (Intel VT or AMD-V).
Exercise To see if the processor supports hardware virtualization:
egrep -c '(vmx|svm)' /proc/cpuinfo
If 0 it means that your CPU doesn’t support hardware virtualization. If 1 or more it does - but you still need to make sure that virtualization is enabled in the BIOS.
Install package cpu-checker:
apt-get install cpu-checker
Verify that the kvm module is loaded into the kernel and the BIOS has virtualization enabled
kvm-ok
If it shows:
INFO: /dev/kvm does not exist
HINT: sudo modprobe kvm_intel
INFO: Your CPU supports KVM extensions
KVM acceleration can be used
Run commands:
modprobe kvm_intel
kvm-ok
You should see now:
INFO: Your CPU supports KVM extensions
INFO: /dev/kvm exists
KVM acceleration can be used
If it shows:
INFO: Your CPU supports KVM extensions
INFO: KVM is disabled by your BIOS
the Virtualization support needs to be enabled in the BIOS
2.15. Preparation for Ubuntu VM installation (Exercise)
Install KVM virtual director:
sudo -s
apt-get install virt-manager
Correct the ownership of the VM image directory:
chown hostadm:hostadm /var/lib/libvirt/images
Add user hostadm to group libvirt:
usermod -a -G libvirt hostadm
Install kvm packages:
apt-get install qemu-kvm qemu-system
Restart libvirtd service:
systemctl restart libvirtd
Logout from the desktop, then login again. Create directory KVM within your home directory and download the installer, ubuntu-18.04.4-server-amd64.iso
mkdir KVM
cd KVM
wget http://cdimage.ubuntu.com/releases/18.04/release/ubuntu-18.04.5-server-amd64.iso
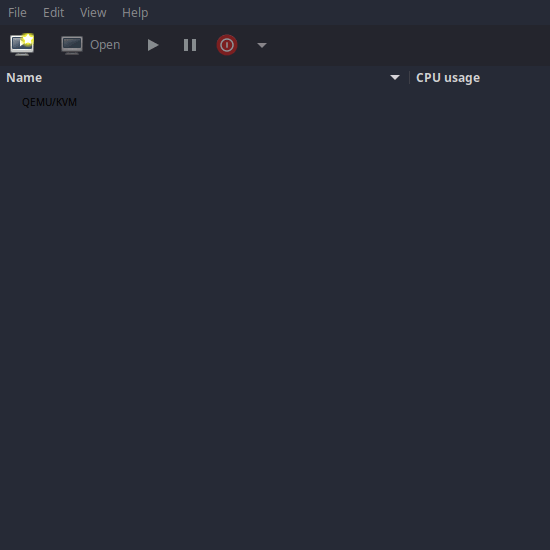
2.16. VM configuration in KVM manager (Exercise)
Launch the Virtual Machine manager: the Virtual Machine Manager will appear in Applications -> System Tools menu.
Click onto the top left icon to create a new virtual machine.

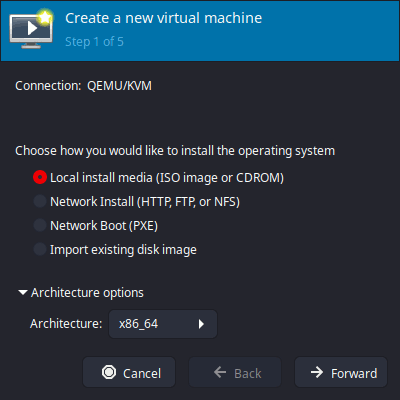
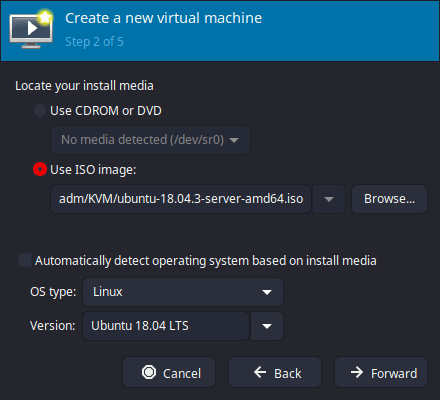
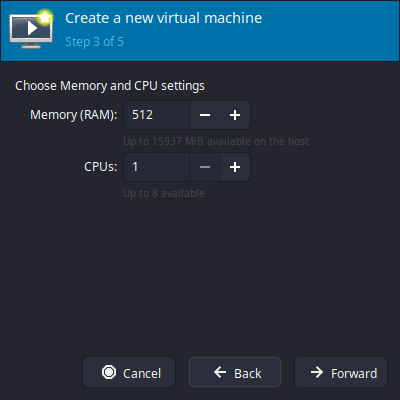
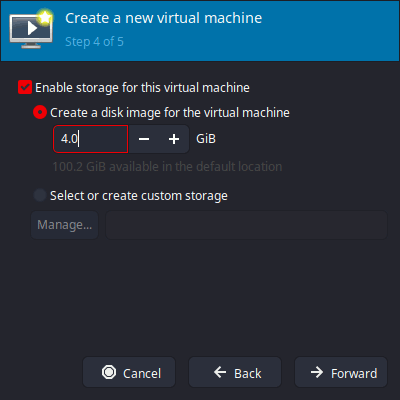
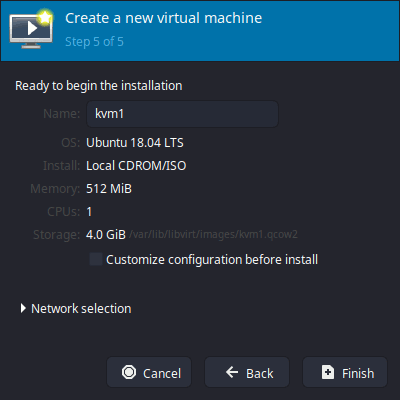
2.17. Create a new virtual machine with the following parameters:
Name: kvm1
Local install media ISO
Use ISO image: /home/hostadm/KVM/ubuntu-18.04.5-server-amd64.iso
OS type: Linux
Version: 18.04
Memory (RAM): 512 MB
CPUs: 1
Disk image: 4.0 GB
Check in “Allocate entire disk now”

2.18. Ubuntu Interactive Installation (Exercise)
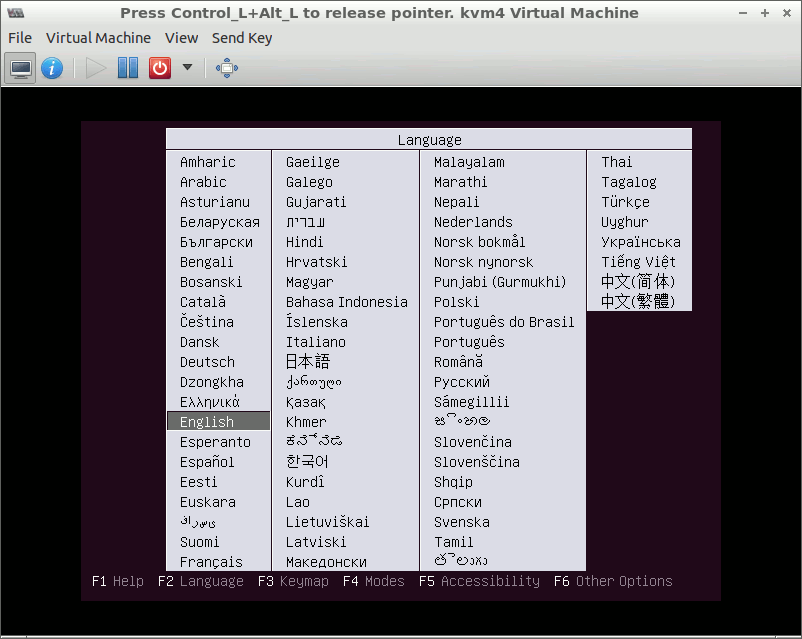
Click onto kvm1 in the KVM manager. It will bring up a virtual console for the VM with the installer running. After accepting ‘English Language’, press F4, which stands for “Modes” in the installer bottom menu line, and scroll down to “Install a minimal virtual machine” selection, press ENTER:
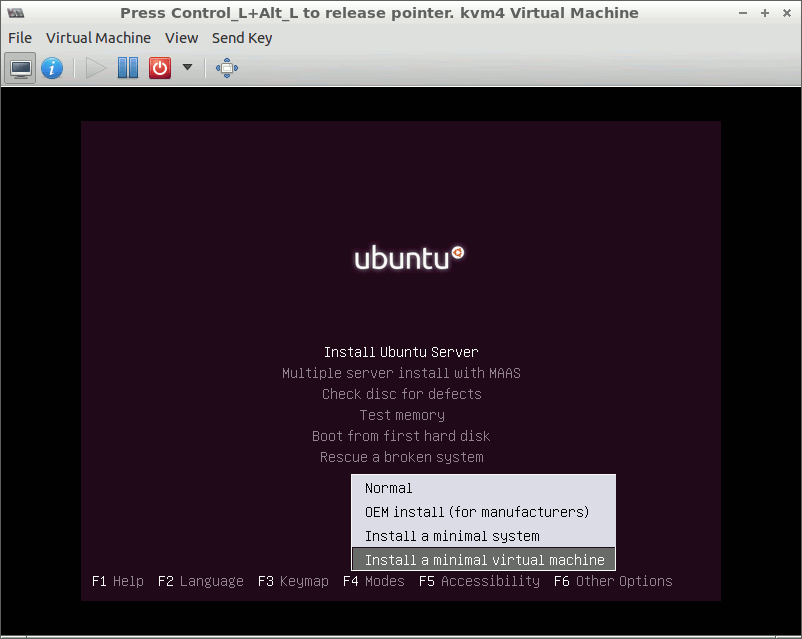
Choose “Install Ubuntu Server”, and press ENTER.
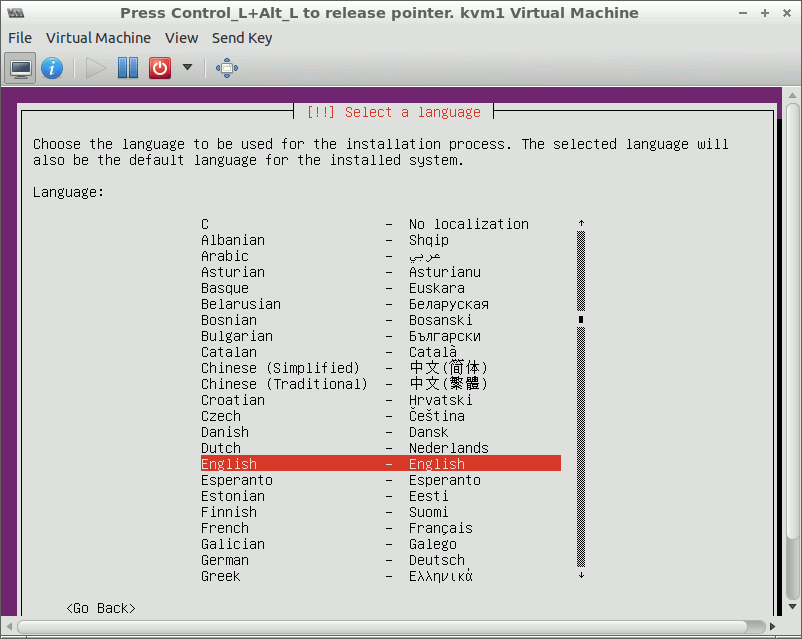
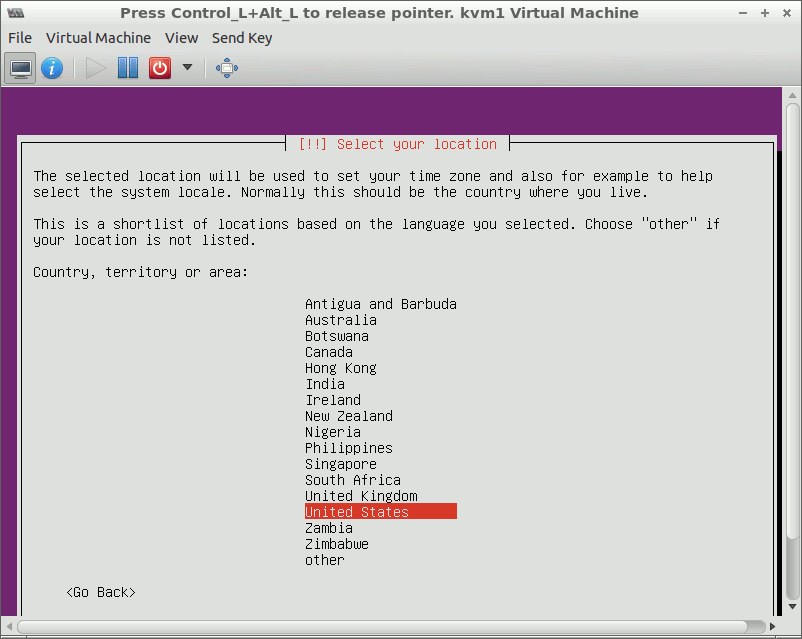
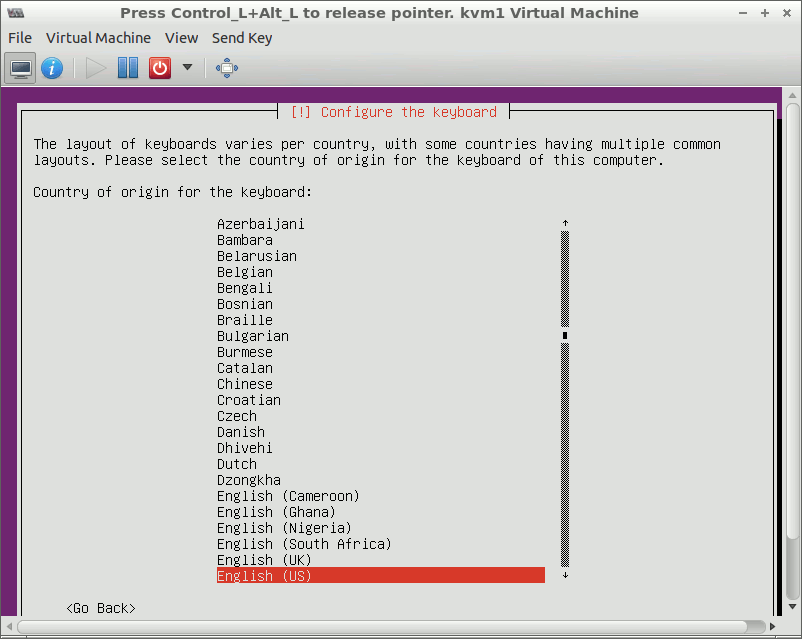
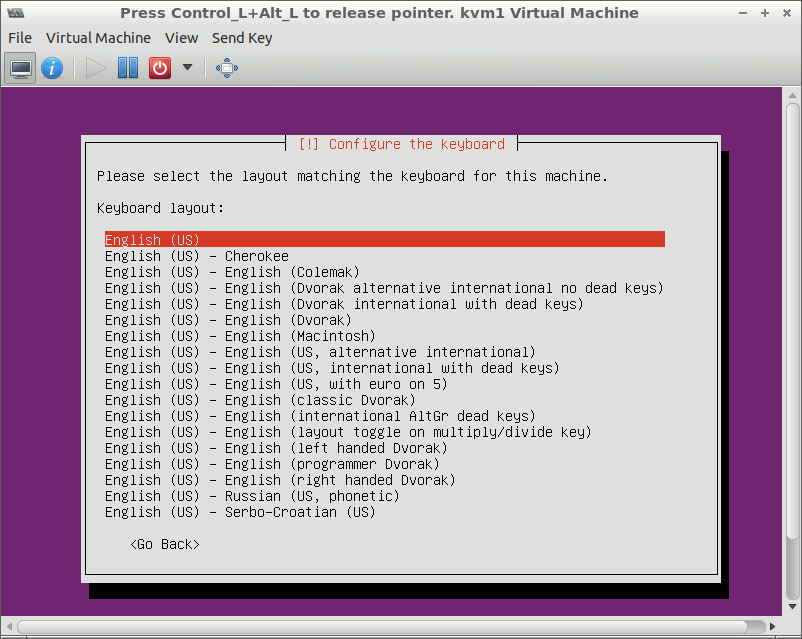
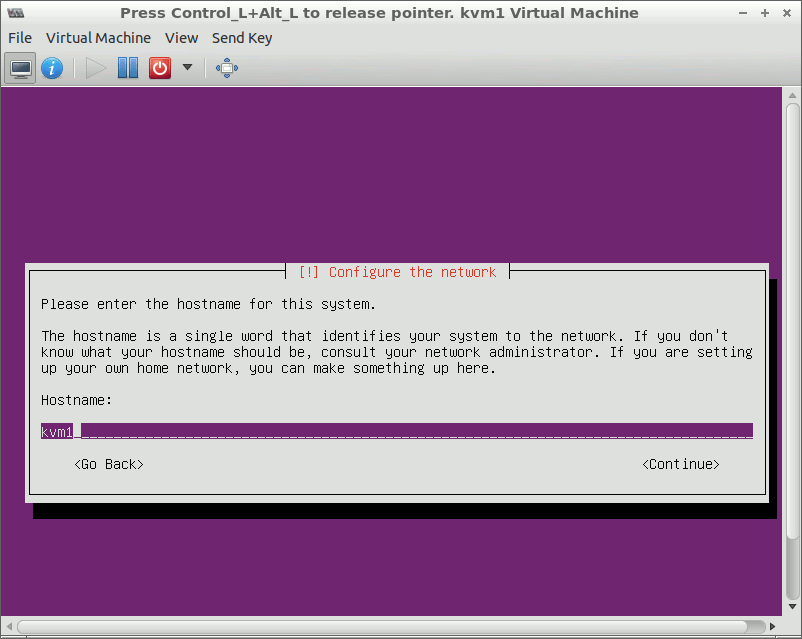
Choose language: English, United States. Choose ‘No’ for detecting keyboard layout, USA for the origin of the keyboard, USA for keyboard layout. In ‘Configure the network’ menu, set ‘kvm1’:

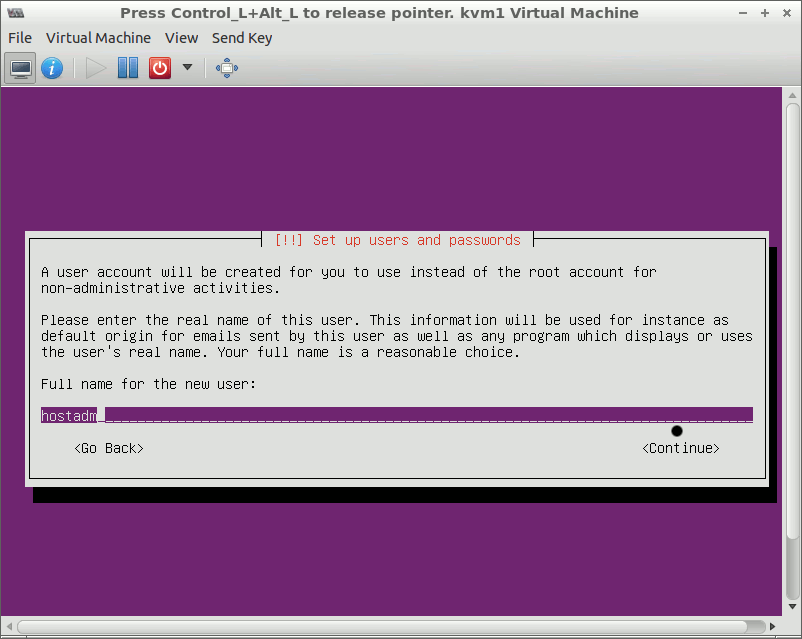
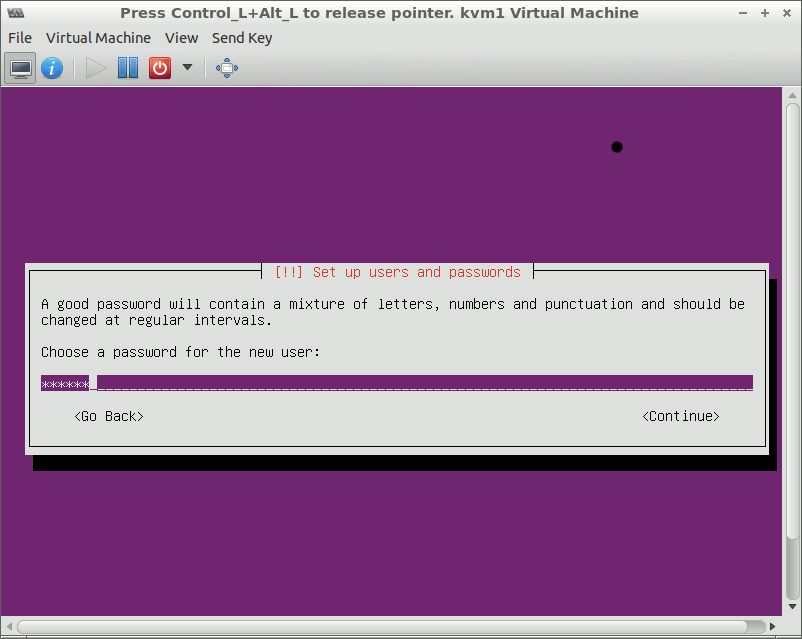
When the installer prompts you, set a new user account,
name: hostadm
passwd: unisys
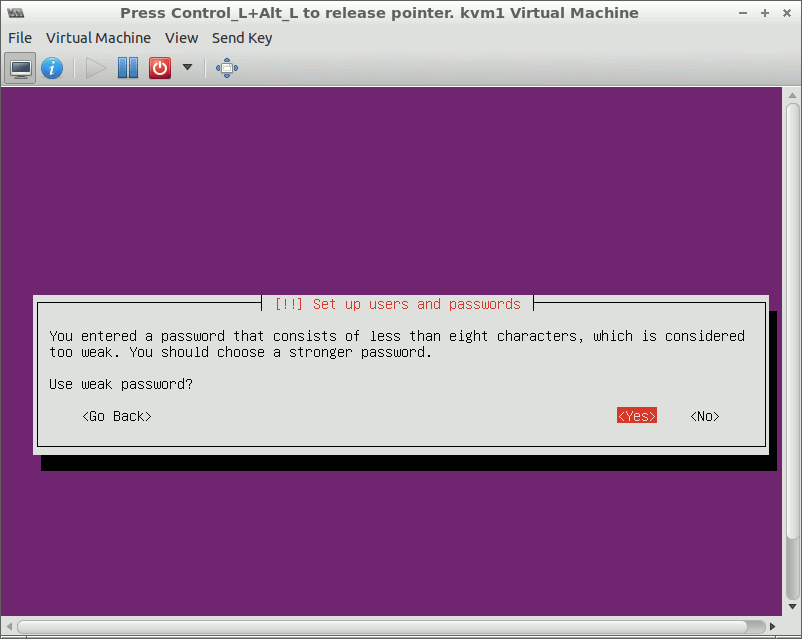
Accept the “weak password” when prompted.
In ‘Configure the clock’, choose Eastern in the time zone list.
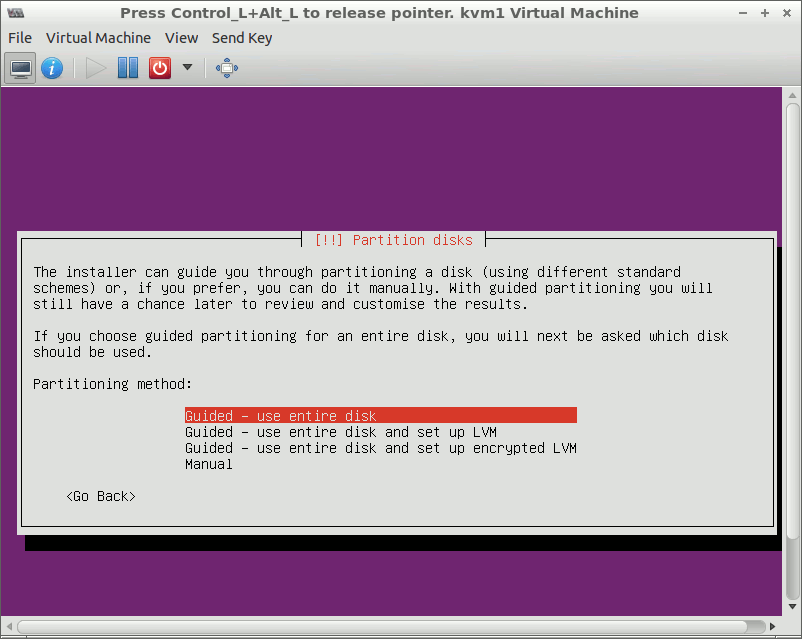
In the partition disks menu, select ‘Guided - use entire disk’ partitioning method.
Choose no encryption for home directory.
Select “No automatic updates”.
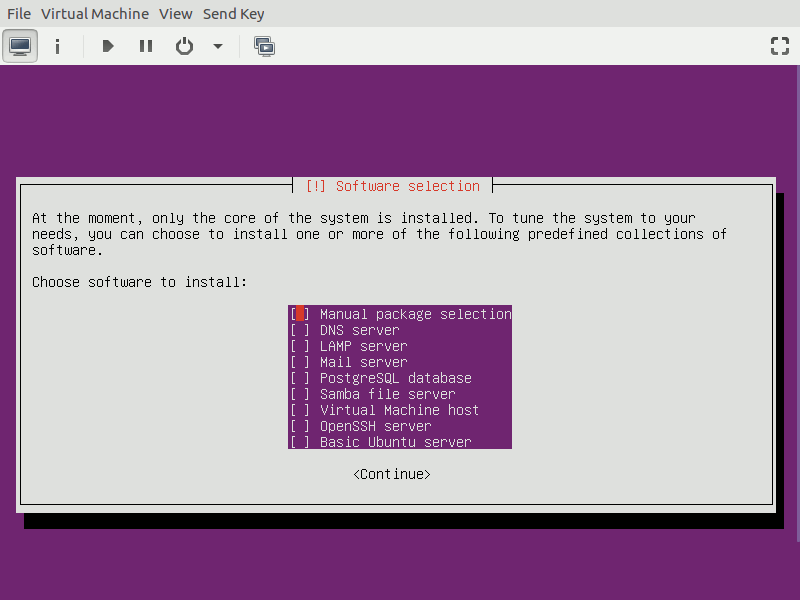
Do not select any additional software to install.
Keep everything in the list unchecked:
When prompted to Install the GRUB boot loader, choose the default option, “Install the GRUB boot loader to the master boot record” .
Accept setting the system clock to UTC.
Click on ‘continue’ when the installation completes.
After the system reboots, login as user hostadm
Install SSH server by using apt
sudo -s
apt-get install openssh-server
Install the latest 4.x Linux kernel available in Ubuntu 18.04 LTS repository:
apt-get update
apt-get install linux-virtual
Install editor nano. The editor is very intuitive to use. The detailed HOWTO can be found here (Links to an external site.)
apt-get install nano
Edit file /etc/default/grub
nano /etc/default/grub
and increase the GRUB prompt timeout from 2 to 10: GRUB_TIMEOUT=10:
| GRUB_TIMEOUT=10 |
Change the value of GRUB_TIMEOUT_STYLE from hidden to menu
|
GRUB_TIMEOUT_STYLE=menu |
Run the commands to update the boot loader configuration, then reboot:
update-grub
reboot
You should be able to see the boot loader prompt when the system boots up.
Login to kvm1 and make sure it is running the kernel you just have installed:
uname -a
It should show Linux kvm1 4.15.0-135-generic…
Uninstall the old kernel related packages:
apt-get remove linux-image-4.15.0-112-generic
apt-get remove linux-headers-4.15.0-112
apt-get remove linux-modules-4.15.0-112-generic
update-grub
After you are done with the exercise, shutdown the virtual machine by issuing shutdown in its command prompt:
shutdown now -h
References: Ubuntu Installation Guide