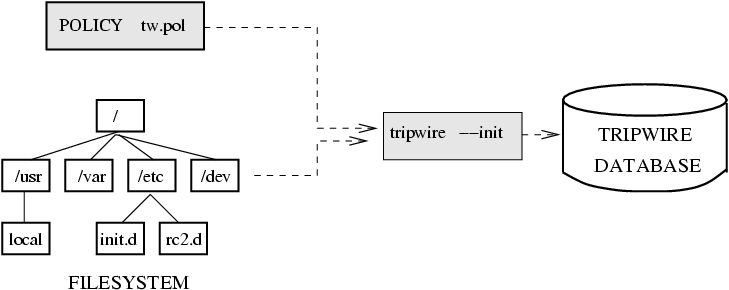
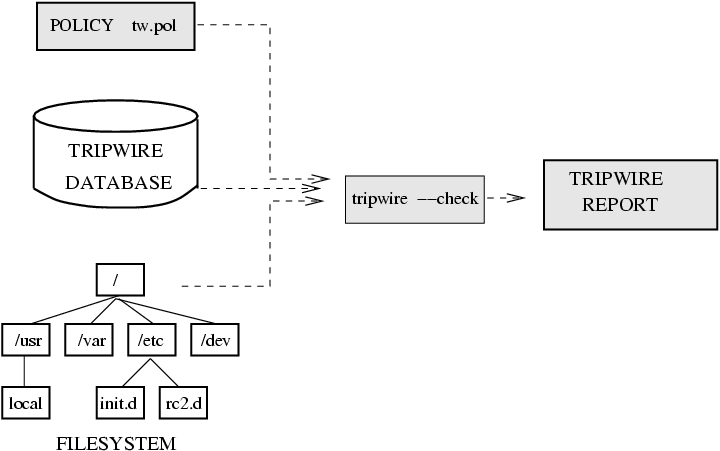
Print the last tripwire report:
md5 checksum by dlocate
Install dlocate and verify md5 checksum of the files installed with package tcpd:
Trojan script:
Run the Trojan script, ls, discussed in the lecture:
create it as a user in /tmp; chmod 755 ls; login as superuser;
modify your path variables including "." ( run export PATH=.:$PATH);
cd /tmp; ls; exit; login as a user; cd /tmp; ./.sh -p then see what happens.
When you finish with the exercise, DON'T FORGET to remove /tmp/.sh !!!
netstat:
Using netstat, see what ports are open on your computer;
If ftp, telnet and finger are running, disable them through inetd.
tcp wrappers:
Set tcp wrappers (modify /etc/hosts.allow and /etc/hosts.deny)
to allow portmap access only from your cluster node.
nmap:
Install nmap on your machine using APT:
apt-get install nmap
Scan TCP ports on computer 192.168.5.16 with OS identification:
nmap -sT -O 192.168.5.16
GNU Privacy Guard:
Install GPG:
apt-get install gnupg
In the example below, there is key and message echange between users
carol (Carol Wilson) and jack (Jack Black). First, you need to
create two user accounts, carol and jack.
You can use the different user names. Note, in the exercise below, you
will need to remember gpg passphrases for each user you will generate.
You may store them in a file or, for simplicity, use the same passphrase
for all the users.
Run gpg --gen-key. Follow the instructions to generate keys:
choose (1) DSA and ElGamal (default);
choose 1024 bit encription; set expiration time two months (2m);
remember the passfrase; keep typing something random while the keys are
being generated.
Make your public key available for exchange
gpg --export --armor carol@soemail.rutgers.edu > carol.pub
File carol.pub contains the public key.
Recipient of your key, Jack Black, imports it:
gpg --import carol.pub
Verifys it:
gpg --fingerprint "Carol Wilson"
If the recipient accepts it, he should sign it:
gpg --edit-key "Carol Wilson"
Command> sign
How carefully have you verified the key you are about to sign actually belongs
to the person named above? If you don't know what to answer, enter "0".
Choose one of the following options (usually 2):
(0) I will not answer. (default)
(1) I have not checked at all.
(2) I have done casual checking.
(3) I have done very careful checking.
Command> save
Carol Wilson creates a new file and signs it.
For example, for a text file netapp.txt,
she creates a signature:
gpg -b netapp.txt
It create a new file, netapp.txt.sig
The recepient, who already has imported and signed your public key,
verifies it:
gpg --verify netapp.txt.sig netapp.txt
If the signature is correct, in the output, there should be:
gpg: Good signature from "Carol Wilson "
Sending/Receiving signed encrypted messages.
Carol needs to import and sign Jack's public key the same way as
he did with her's. The sender use the recepient's public keys to
encrypt a message. The recepient decrypts the message with the private
key.
Sender, Carol Wilson, encrypts file netapp.txt with Jack's public key and
saves it in a new file, forjack.gpg:
cat netapp.txt | gpg -sea -r "Jack Black" > forjack.gpg
Carol Wilson gives or sends file forjack.gpg to Jack Black.
Receiver, Jack Black, reads the file:
gpg -d forjack.gpg
To save the output in a text file, say forjack.txt:
gpg -d -o forjack.txt forjack.gpg
Verify signature for dowloaded software:
Download the following files:
DJM-GPG-KEY.asc
openssh-4.4p1.tar.gz
openssh-4.4p1.tar.gz.asc
Import the public key:
gpg --import DJM-GPG-KEY.asc
Check if the key has been added:
gpg --fingerprint
Signe the key:
gpg --edit "Damien Miller (Personal Key) "
Command> sign
Command> save
Verify that the signute for the software is good:
gpg --verify openssh-4.4p1.tar.gz.asc openssh-4.4p1.tar.gz
Delete the key from the keyring:
gpg --delete-keys "Damien Miller (Personal Key) "
Verify that the key has been deleted:
gpg --fingerprint
Using GNUtar for consistensy check:
You already have downloaded file ssh-3.2.9.1.tar.gz in the GPG exercises.
Unzip and untar the archive and then tar it again so tar assign your
ownership to the files in the new archive:
gunzip openssh-4.4p1.tar.gz
tar -xvf openssh-4.4p1.tar
tar -cvf openssh-4.4p1.tar openssh-4.4p1
Consistency check:
tar -df openssh-4.4p1.tar openssh-4.4p1
It should show you nothing since the archive contains files
with identical attributes.
Edit file openssh-4.4p1/ChangeLog and create a new line in it.
Run the consistency check again:
tar -df openssh-4.4p1.tar openssh-4.4p1
See the results: 'Mod time differs', 'Size differs'
Configuring iptables firewall:
Make sure iptables has been installed:
dpkg -l | grep iptables
Check iptables rules:
/sbin/iptables -n -L
Copy the iptables script from the lecture notes into fw-script.sh script,
make it executable, then run.
Check the rules running again the same command,
/sbin/iptables -n -L
You should see new active chains.
Try to ping your node.
Try to ssh to your node.
If you succeed, try to ping your desktop machine.
To enable ping, you need to add the following rules to your fw-script.sh
(you can include them somwhere after the default policy)
# Echo - uncomment to allow your system to be pinged.
$IPT -A INPUT -p icmp -s 192.168.5.0/24 --icmp-type 0 -j ACCEPT
$IPT -A INPUT -p icmp -s 192.168.5.0/24 --icmp-type 8 -j ACCEPT
$IPT -A INPUT -p icmp -s 192.168.5.0/24 --icmp-type 11 -j ACCEPT
$IPT -A OUTPUT -p icmp -d 192.168.5.0/24 --icmp-type 0 -j ACCEPT
$IPT -A OUTPUT -p icmp -d 192.168.5.0/24 --icmp-type 8 -j ACCEPT
$IPT -A OUTPUT -p icmp -d 192.168.5.0/24 --icmp-type 11 -j ACCEPT
|
After the script is modified, you need to run it, ./fw-script.sh
If you run LDAP client on the node, you may also need to allow
access to LDAP ports, tcp/389 and tcp/636:
# Accept LDAP traffic to port tcp/389 and tcp/636
$IPT -A INPUT -m state -p tcp --dport 389 ! --state INVALID -s 192.168.5.0/24 -j ACCEPT
$IPT -A OUTPUT -m state -p tcp --sport 389 --state ESTABLISHED,RELATED -d 192.168.5.0/24 -j ACCEPT
$IPT -A INPUT -m state -p tcp --dport 636 ! --state INVALID -s 192.168.5.0/24 -j ACCEPT
$IPT -A OUTPUT -m state -p tcp --sport 636 --state ESTABLISHED,RELATED -d 192.168.5.0/24 -j ACCEPT
|
Try to ssh somwhere outside of the subnet, for example, engsoft or eden.
To enable return TCP-connections from the outside of the subnet, change
"-s 192.168.5.0/24" and "-d 192.168.5.0/24" for "-s 0/0" and "-d 0/0" in
the rules for "Accept local-network return traffic..." in the script.
Restart the script and try ssh to outside hosts.
Read Chapter 44