Practical exercizes

To be completed by 3/23/2005

Objective:

Setup OpenLDAP server on your desktop and OpenLDAP client on the node.
1. Install OpenLDAP packages On the server: slapd ldap-utils libldap2 On the client: ldap-utils libldap2 libnss-ldap libpam-ldap You can exit the configuration stage since you will configure LDAP manually. Remove the databases created during LDAP setup: rm -rf /var/lib/ldap/* 2. Setup LDAP server. Create file /etc/ldap/slapd.conf Choose a unique dc (Domain Component) name, for example, dc=uni02, dc=unisys, dc=com if you are using unisys02 and node02.
# See slapd.conf(5) for details on configuration options.
# This file should NOT be world readable.
#
# Include Schemas
include         /etc/ldap/schema/core.schema
include         /etc/ldap/schema/cosine.schema
include         /etc/ldap/schema/nis.schema
include         /etc/ldap/schema/inetorgperson.schema

# Where the dynamically loaded modules are stored
modulepath      /usr/lib/ldap
moduleload      back_ldbm

# ldbm database definitions
database        ldbm

# Define Domain components and Root distinguished name (Manager)
suffix          "dc=uni02, dc=unisys, dc=com"
rootdn          "cn=Manager,dc=uni02,dc=unisys,dc=com"

# Where the database file are physically stored for database #1
directory       "/var/lib/ldap"

# Cleartext passwords, especially for the rootdn, should
# be avoided.  See slappasswd(8) and slapd.conf(5) for details.
# Use of strong authentication encouraged.
# Root password can be created with:
# perl  -e "print crypt(thisp, ac,)" > pass.txt
# rootpw         thisp
rootpw          {crypt}acunRNwFPEdHQ

# slapd process ID file
pidfile         /var/run/slapd/slapd.pid

3. start LDAP: /etc/init.d/slapd start To make sure LDAP is running, execute ldapsearch: ldapsearch -x -LL -b '' -s base '(objectclass=*)' namingContexts You should see: namingContexts: dc=uni02,dc=unisys,dc=com 4. Bind the client, node02, to the server by editing file /etc/ldap/ldap.conf and leaving uncommented only two entries: HOST unisys02 BASE dc=uni02,dc=unisys,dc=com Similarly, bind the server, unisys02, to itself by creating the same file, /etc/ldap/ldap.conf 
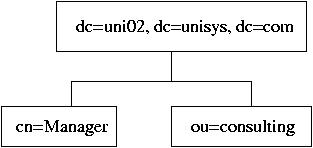
5. Outline of the directory is the following:

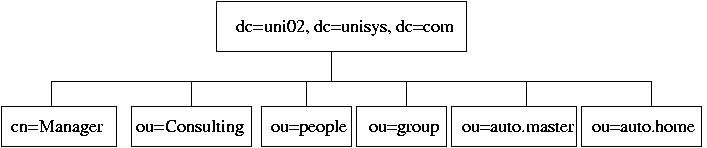
On the server, create LDIF file, init.ldif, so far, including only a part of the Directory: dn: dc=uni02,dc=unisys,dc=com dn: cn=Manager, dc=uni02, dc=unisys, dc=com dn: ou=Consulting, dc=uni02,dc=unisys,dc=com and a few cn entries for ou=Consulting: dn: cn=Dennis Ritchie, ou=Consulting, dc=uni02,dc=unisys,dc=com dn: cn=Ken Thompson , ou=Consulting, dc=uni02,dc=unisys,dc=com
# Root node
dn: dc=uni02,dc=unisys,dc=com
objectclass: organization
objectclass: dcObject
o: uni02.unisys.com
dc: uni02

# The list branch node
dn: ou=Consulting, dc=uni02,dc=unisys,dc=com
objectclass: organizationalUnit
ou: Consulting

# The Super-User's node
dn: cn=Manager, dc=uni02, dc=unisys, dc=com
objectclass: organizationalRole
cn: Manager

# A leaf node
dn: cn=Dennis Ritchie, ou=Consulting, dc=uni02,dc=unisys,dc=com
objectclass: person
cn: Dennis Ritchie
sn: Ritchie

# Another leaf node
dn: cn=Ken Thompson , ou=Consulting, dc=uni02,dc=unisys,dc=com
objectclass: person
cn: Ken Thompson
sn: Thompson

6. ldapadd -x -D 'cn=Manager,dc=uni02,dc=unisys,dc=com' -W -f init.ldif 7. On the client, node02, run ldapsearch -x -L -b 'dc=uni02,dc=unisys,dc=com' '(objectclass=*)' ldapsearch -x -LL -b 'dc=uni02,dc=unisys,dc=com' '(cn=*)' ldapsearch -x -LL -b 'dc=uni02,dc=unisys,dc=com' '(cn=Ken Thompson)' 8. Create a new LDIF file, people.ldif:
dn: ou=passwords, dc=uni02, dc=unisys, dc=com
ou: passwords
objectclass: organizationalUnit

dn: ou=group, dc=uni02, dc=unisys, dc=com
ou: group
objectclass: organizationalUnit 
9. Add it to the LDAP database: ldapadd -x -D 'cn=Manager,dc=uni02,dc=unisys,dc=com' -W -f people.ldif Check if the "ou" entries are in the database. On the client, run ldapsearch -x -LL -b 'dc=uni02,dc=unisys,dc=com' 10. Delete Organizational Units "passwords" and "group": create a file, delp.txt: ou=passwords, dc=uni02, dc=unisys, dc=com ou=group, dc=uni02, dc=unisys, dc=com Run ldapdelete -x -D "cn=manager,dc=uni02,dc=unisys,dc=com" -W -f delp.txt 11. Modify people.ldif:
dn: ou=People, dc=uni02, dc=unisys, dc=com
ou: People
objectclass: organizationalUnit

dn: ou=group, dc=uni02, dc=unisys, dc=com
ou: group
objectclass: organizationalUnit
Run ldapadd -x -D 'cn=Manager,dc=uni02,dc=unisys,dc=com' -W -f people.ldif 12. On the server, enable shadow passwords by running command pwconv Create a new user group, ldap: groupadd -g 1200 ldap Create a new user, say, jack: useradd -u 1200 -g 1200 -m -s /bin/bash jack Set a password for the user. Install migradiontools package on the server: apt-get install migrationtools Copy common, password, and group migration Perl scripts from /usr/share/migrationtools into your current directory. cp /usr/share/migrationtools/migrate_passwd.pl . cp /usr/share/migrationtools/migrate_group.pl . cp /usr/share/migrationtools/migrate_common.ph . Modify file migrate_common.ph: # Default DNS domain $DEFAULT_MAIL_DOMAIN = "unisys02.unisys.com"; # Default base $DEFAULT_BASE = "dc=uni02,dc=unisys,dc=com"; # turn this on to support more general object clases # such as person. $EXTENDED_SCHEMA = 1;
$USE_UTF8 = 0; # Uncomment these to exclude Debian-managed system users and groups $IGNORE_UID_BELOW = 1200; $IGNORE_GID_BELOW = 1200; # And here's the opposite for completeness $IGNORE_UID_ABOVE = 9999; $IGNORE_GID_ABOVE = 9999; Comment out the DEFAULT_REALM setting in the EXTENDED schema settings. # $DEFAULT_REALM = $DEFAULT_MAIL_DOMAIN; # $DEFAULT_REALM =~ tr/a-z/A-Z/; By using the migration script, migrate user accounts into LDIF file passwd.ldif: ./migrate_passwd.pl /etc/passwd > passwd.ldif File passwd.ldif should contain entries only for user jack. Add the new user entry to the database: ldapadd -x -D 'cn=Manager,dc=uni02,dc=unisys,dc=com' -W -f passwd.ldif 13. Create a group LDIF file using migrate_group.pl script: ./migrate_group.pl /etc/group > group.ldif File group.ldif should contain only entries for group ldap. Add the group entries to LDAP database: ldapadd -x -D 'cn=Manager,dc=uni02,dc=unisys,dc=com' -W -f group.ldif On the client, node02, run ldapsearch on user jack to make sure the user entries are in the database: ldapsearch -x -LL -b 'dc=uni02,dc=unisys,dc=com' 'cn=jack' 14. Set the the client, node02, to authenticate users agains the LDAP server. Modify /etc/nsswitch.conf: passwd: files ldap group: files ldap shadow: files ldap # hosts: files dns ldap networks: files ldap # protocols: db files services: db files ethers: db files rpc: db files # netgroup: nis Edit file /etc/libnss-ldap.conf and have the following entries: # Your LDAP server IP address host 192.168.5.2 base dc=uni02,dc=unisys,dc=com ldap_version 3 Edit file /etc/pam_ldap.conf and have the following entries: # Your LDAP server IP address host 192.168.5.2 base dc=uni02,dc=unisys,dc=com ldap_version 3 pam_password md5 Backup the following PAM modules in /etc/pam.d: passwd, ssh, su: cd /etc/pam.d cp su su-orig cp ssh ssh-orig cp passwd passwd-orig Copy PAM modules with the same name from /usr/share/doc/libpam-ldap/examples/ cp /usr/share/doc/libpam-ldap/examples/pam.d/su su cp /usr/share/doc/libpam-ldap/examples/pam.d/ssh ssh cp /usr/share/doc/libpam-ldap/examples/pam.d/passwd passwd modify /etc/pam.d/passwd as follows: #password required /lib/security/pam_cracklib.so retry=3 #password sufficient /lib/security/pam_ldap.so #password required /lib/security/pam_pwdb.so try_first_pass password required pam_ldap.so ignore_unknown_user md5 password optional pam_unix.so nullok obscure min=4 max=8 md5 try_first_pass Check if the client recognizes user jack: id jack If so, ssh to the client from the server as user jack: ssh jack@node02 Become root by running command su Browse the user's LDAP entries: ldapsearch -x -LL -b 'dc=uni02,dc=unisys,dc=com' 'cn=jack' You should be able to see the password hash since there was no any access restriction set for the LDAP entries on the server. Note, in Debian, libnss and nsswitch work with the generic Unix PAM, pam_unix.so, and can handle LDAP user authentication without PAM LDAP, unless, a restricted access control, discussed below, is implemented. 15. Secure access to LDAP directory adding the following access rules to the end of slapd.conf:
#Access control
access to attr=userPassword
     by self write
     by anonymous auth
     by dn="cn=Manager,dc=uni02,dc=unisys,dc=com"  write
     by *   compare

access to *
     by self write
     by dn="cn=Manager,dc=uni02,dc=unisys,dc=com"  write
     by *   read
Restart slapd: /etc/init.d/slapd stop /etc/init.d/slapd start Make sure the passwords no longer show up on the client when you run ldapsearch -x -LL -b 'dc=uni02,dc=unisys,dc=com' 'cn=jack' 16. Login to the client, node02, as user jack. Change password running command passwd. Has the password been changed in LDAP databases? Has it been changed in /etc/shadow on the server? 17. As root, create a new directory /home/LDAP on the server mkdir /home/LDAP On the server, re-create user jack with HOME directory under /home/LDAP and modify the entries in the LDAP databases on the server: userdel -r jack useradd -g ldap -u 1200 -m -d /home/LDAP/jack -s /bin/bash jack passwd jack ./migrate_passwd.pl /etc/passwd > passwd.ldif ldapmodify -x -D 'cn=Manager,dc=uni02,dc=unisys,dc=com' -W -f passwd.ldif 18. Install package autofs-ldap on both the desktop and the node hosts: apt-get install autofs-ldap On the desktop, also install nfs-kernel-server: apt-get install nfs-kernel-server then edit file /etc/exports: /home/LDAP node02(rw) Re-start NFS server: /etc/init.d/nfs-kernel-server stop /etc/init.d/portmap restart /etc/init.d/nfs-kernel-server start Modify file /etc/ldap/slapd.conf by including autofs.schema in the list of included schemas: include /etc/ldap/schema/autofs.schema Restart LDAP: /etc/init.d/slapd restart Create LDIF file, automount.ldif, for NFS automounts, taking into account that, on node02, we need to mount unisys02:/home/LDAP onto /home/LDAP. Contents of automount.ldif:
dn: ou=auto.master,dc=uni02,dc=unisys,dc=com
objectClass: top
objectClass: automountMap
ou: auto.master

dn: ou=auto.home,dc=uni02,dc=unisys,dc=com
objectClass: top
objectClass: automountMap
ou: auto.home

dn: cn=/home, ou=auto.master,dc=uni02,dc=unisys,dc=com
objectClass: automount
automountInformation: ldap:ou=auto.home,dc=uni02,dc=unisys,dc=com --timeout 60
cn: /home

dn: cn=LDAP,ou=auto.home,dc=uni02,dc=unisys,dc=com
objectClass: automount
automountInformation: -rw,hard,intr unisys02:/home/LDAP
cn: LDAP
Update the LDAP database: ldapadd -x -D 'cn=Manager,dc=uni02,dc=unisys,dc=com' -W -f automount.ldif Check if the client, node02, can access the maps through LDAP: ldapsearch -x -LL -b 'dc=uni02,dc=unisys,dc=com' '*' If you see the NFS maps on the client, prepare the automount to mount /home/LDAP over NFS. Add entry a new entry, automount: ldap, in the end of /etc/nsswitch.conf on the client. Unmount /home file system, umount /home Restart portmap and autofs on the client: /etc/init.d/portmap restrt /etc/init.d/autofs restart SSH to node02 as user jack: ssh jack@node02 You should get into his home directory mounted over NFS from the server. 19. Create an entry in /etc/hosts.deny on the LDAP server: slapd: ALL Check id you can run ldapsearch on the client. Overwrite the denial to access slapd in /etc/hosts.allow: slapd: 192.168.5.22 127.0.0.1 Run ldapsearch again on the client.


Previous Pageprevious First Pagetop