Lecture 02/25/2004


 Unix and Windows connectivity through Samba server


I.   Elements of Windows networking.

II.  Unix Samba server.

III. Practical assignments:

     A) Dual-boot Linux and Windows 2000 installation.

     B) Configuration of Samba server.
Elements of Windows networking.
Early 80s, domination of propriatery network hardware and protocols:
Apple: AppleTalk
Digital: DECnet
IBM Mainframes: Systems Network Architecture (SNA)
In early-mid 80s, IBM and Sytec developed PC Network to connect PC computers on a local network.
Network Basic Input Output System (NetBIOS) was the software interface to
the PC Network hardware. It offered a set of commands that could control
the hardware, establish and delete sessions, transfer data, etc.
Non TCP/IP based yet, local network support only.
NetBIOS names are not DNS names.
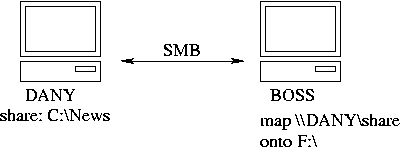
Microsoft introduced Server Message Block (SMB) protocol in DOS for disk I/O
redirection to the NetBIOS. That allowed sharing disk drives over LAN.
Later, in Windows OS, Microsoft added "browsing" (list of shares)
and central authentication with Domain Controller features.
Now days, NetBIOS is working on top of higher level protocols (TCP/IP, DECnet,
IPX/SPX). That allows SMB to work across routable LANs.
NetBIOS name resolution (name - to - IP ):
broadcast (on LAN)
lmhosts
WINS servers
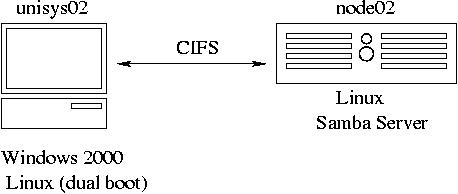
In 1996/97, Microsoft commercially updated SMB and gave it a new name,
Common Interface File System (CIFS)
The four basic CIFS functions:
- Name resolution
- Service announcement (browsing)
- File and print services sharing
- Authentication and Authorization
Starting with Windows 2000, Microsoft decoupled NetBIOS from CIFS.
CIFS can rely on DNS and supports NetBIOS for backward compatibility.
To allow file system connectivity with Windows clients, Unix servers and
Network Attached Storage (NAS) devices need to provide CIFS support.
In the future, Microsoft is planning to migrate to WinFS and drop CIFS.
Recommended reading: Linux Magazine, May 2001, article
"Understanding the Network Neighborhood" by Christopher R. Hertel
Unix Samba server
Unix - Windows file sharing
Set Windows machines to understand Unix NFS ( Microsoft Services for Unix ).
-- Kind of useless with existence of Cygwin and Samba
Set Unix to appear as an SMB file server to Windows ( Samba, Sun PC Link ).
-- Very powerful tools.
In early 90-s, Andrew Tridgell wrote a server software to share
Unix files with PC clients on SMB basis.
Later, he called the software Samba.
Now days, Samba is being developed by the Open Source community:
Samba services bind to TCP/UDP ports 137 -- 139 and
provide CIFS functionality:
nmbd - Windows name resolution and browsing.
smbd - File sharing and Authentication
Samba Configuration
Samba can be compiled from source or installed as RPM packages:
samba
samba-client
samba-common
Configuration file /etc/samba/smb.conf
Any line which starts with a ; (semi-colon) or a # (hash)
is a comment and is ignored.
# ==================== Global settings =====================
[global]
# === You need to choose a unique domain name ==============
workgroup = UNISYS
encrypt passwords = yes
domain logons = yes
security = user
smb passwd file = /etc/samba/smbpasswd
hosts allow = 192.168.5.1
wins support = yes
domain master = yes
load printers = yes
printcap name = /etc/printcap
printing = lprng
# ==================== Share Definitions =====================
[homes]
comment = Home Directories
path = /home/%U
valid users = %S
writeable = yes
browsable = no
[printers]
comment = All Printers
path = /var/spool/samba
browsable = no
guest ok = no
printable = yes
# ================= Additional Shares can be added below=====
Whenever you modify this file, you should run the command "testparm"
to check that you have not made any basic syntactic errors.
With the configuration above, the Samba server becomes a Domain Controller
for domain UNISYS and shares "homes", users home directories, and printers
listed in /etc/printcap
Default Samba log files are located in directory /var/log/samba.
You can run man smb.conf to see the list of all
possible configuration parameters and options for smb.conf.
Create Samba user and client host (trust) accounts.
Users should exist in both Unix and Samba password files.
If login names are different in the two accounts, map them in /etc/samba/smbusers.
Unix passwords (/etc/passwd, /etc/shadow, or NIS maps):
alexei:$1$Dblngr.F$.ZQdmksQzAqFSegnUp0ZB:500:500::/home/alexei:/bin/bash
Windows passwords (/etc/samba/smbpasswd):
alexei:500:40B5546653BF1E471D71060D896B7A46:72B51AA6979379A20D2936E4E0B1D6B0:[UX]:LCT-3E52CBFE:
With clear text passwords, "encrypt passwords = no", authentication for SMB
shares is done through Unix passwords; Domain Controller authentication
can be done only through Samba passwords.
Unix and Windows use different encryprion schemes for passwords, /etc/passwd and /etc/samba/smbpasswd.
The password synchronization is still a serious open issue.
Start Samba daemons, smb and nmb.
/etc/rc.d/init.d/smb start
Every time you modify /etc/samba/smb.conf file, you need to restart the
Samba daemons for changes to take effect.
Now you should be able to map the home directories onto Windows clients,
bind the clients to Domain UNISYS, and authenticate users with the Domain
Controller.
Assignment due by 03/3/2004
To practice with Samba server, you need to have Windows installed on
your desktop, and Samba server installed and configured on your
rack-mounted node. Throughout the discussion below, I nominate the
desktop and node as unisys02 and node02. You need to change their names
for that of your computers, accordingly.
A) Dual-boot Linux and Windows 2000 installation on your desktop
1. Create kickstart script to install Linux.
In the partition table part of the script, there should be an additional
primary partition for windows, /win, of vfat type:
part /win --fstype vfat --size 1500 --asprimary
Specify location of a boot
loader in the boot sector of the Linux partition, not MBR:
bootloader --location=partition
Example of the kickstart file, ks.cfg
Create installation boot and driver floppies:
mount -t nfs 192.168.5.250:/usr/src/cd90 /mnt/nfs
cd /mnt/nfs/images/
dd if=bootdisk.img of=/dev/fd0 bs=1440k count=1
dd if=drvnet.img of=/dev/fd0 bs=1440k count=1
umount /mnt/nfs
Copy your kickstart script onto the installation boot floppy.
Hard drive partitions will be set as follows:
2. Run kickstart Linux installation: boot with the installation
floppy and, at the prompt, type linux ks=floppy
3. Boot into Linux;
remove /win directory entry from /etc/fstab;
create a boot floppy: put a new floppy in the floppy drive and run
mkbootdisk --device /dev/fd0 2.4.20-8;
make sure that /boot partition is located in /dev/hda1 and
create an image of the boot sector:
dd if=/dev/hda1 of=linux.bin bs=1024 count=1;
copy the image onto the same boot floppy:
mcopy linux.bin a:
4. Reboot. Set BIOS to boot from CD-ROM device first.
5. Boot from Windows 2000 installation CD; choose to install Windows 2000 on
the FAT partition and format it as NTFS; Accept this partition as active.
When prompted for computer name during the installation, give the name of
your unisys desktop, for example, unisys02; Check in WORKGROUP.
6. When installation is done, set BIOS back to boot from floppy first.
7. Boot into Windows 2000; start command prompt;
cd C:
copy a:\linux.bin .
edit boot.ini
Add another line in boot.ini:
c:\linux.bin="Linux RH 9.0"
8. Restart your machine, and you should be able to see two choices appear
on your screen at boot time.
9. To access your cluster node, install SSH client on your Windows desktop,
for example, PuTTY, putty.exe
B) Configuration of Samba server on your cluster node
1. On your cluster node, make sure that the following RPM packages have
been installed.
samba
samba-client
samba-common
If they are not there, install them.
2. Copy the demo /etc/samba/smb.conf into /etc/samba/smb.conf-original
Configure simple smb.conf file replacing its all original content with
the text below. For Domain Name, pick up
a unique name, for example, your Windows machine name with extension
"DOM", UNISYS02_DOM:
[global]
# You need to choose a unique domain name
workgroup = UNISYS02_DOM
encrypt passwords = yes
domain logons = yes
security = user
smb passwd file = /etc/samba/smbpasswd
hosts allow = 192.168.5.2
wins support = yes
domain master = yes
[homes]
path = /home/%U
valid users = %S
writeable = yes
Run the command "testparm" to make sure there is no syntactic errors in smb.conf
3. Create Samba client host trust account on the node for your desktop windows machine.
For example:
groupadd -r trust
useradd -r -g trust -d /dev/null -s /dev/null unisys02$
smbpasswd -a -m unisys02
Add user accounts, for example:
smbpasswd -a root
smbpasswd -a alexei
4. Start Samba daemons, smb and nmb, on the node:
/etc/rc.d/init.d/smb start
5. Access Shares on the Windows desktop.
Browsing and accessing the SMB shares from a Windows machine.
On a Windows machine, click on "My Network Places"; click on "entire
contents"; Microsoft Windows Network; choose the Domain you specified in
smb.conf; choose the SMB server; provide user name and password of any
user who has an account in smbpasswd. In the new window, you should see the
home directory content on the SMB server.
Mounting shared drives.
Right click on "My Computer"; choose "Map network drive"; choose
drive letter, for example, F; for the folder, type \\node02\homes;
provide user name and password. You should see a new drive F appeared
in folder My Computer.
Unmounting shared drives.
Right click on "My Computer"; choose "Disconnect Network Drive";
select the Drive to disconnect; OK.
Mounting and Unmounting shared drives can be done through DOS prompt.
To mount share homes from node02:
net use F: \\node02\homes /USER:alexei
To check what shares are mounted:
net use
To unmount the share:
net use F: /delete
6. Binding to the Domain Controller.
Right click on "My Computer"; slide to Properties; choose Network
Identification;
Click on Properties; check-in Member of Domain; type-in the Domain
Name, which you have specified on the Samba server; OK.
When you reboot the machine, you should be able to logon to the
Domain with your user name and password stored on the Samba server.
You home directory would be maped as drive Z. When you logon
to the Domain at first time, Windows creates folder profile in
your home directory.
7. Accessing Windows shares from the Linux node.
Your Samba server can act as an SMB client accessing Windows shares.
For example, create a new folder, C:\shares, on your Windows computer.
Right click on folder shares; choose sharing; check-in Share this folder;
name it "shares"; click on Permissions; Add; in UNISYS** domain put
your login name and password; add also Administrator; click Apply; OK.
Create some text file in folder C:\shares.
Mounting Windows shared drives on Linux:
mkdir /mnt/smb
mount -t smbfs -o username="UNISYS02\Administrator",passwd=Alpha //unisys02/shares /mnt/smb
df -h
Check the content of directory /mnt/smb.
Unmount it:
umount /mnt/smb
Mount the directory again accessing it as a Domain user:
mount -t smbfs -o username=alexei,passwd=mypassword //unisys02/shares /mnt/smb
df -h
Then unmount it, umount /mnt/smb
Run SMB client on the Linux machine:
smbclient //unisys02/shares -U "UNISYS02\Administrator"
type-in password
To exit, type "quit" at the prompt:
smb: \> quit
Access it again as a Domain user:
smbclient //unisys02/shares -U alexei
To see the list of the commands, type "help" or "?"
smb: \> help
smb: \> quit
8. Read Chapter 39
Recommended reading: Linux Magazine, Feb. 2002, "Using Samba as a PDC" by Andrew Bartlett