Lecture 02/4/2004


 Linux networking


Computers on Internet communicate via sending and receiving network datagrams.
The datagrams are sent, received, forwarded, and processed according to
 network protocols.
I. Introduction to TCP/IP protocol suit.
II. Configuring Linux box on a network.
I. Introduction to TCP/IP protocol suit.
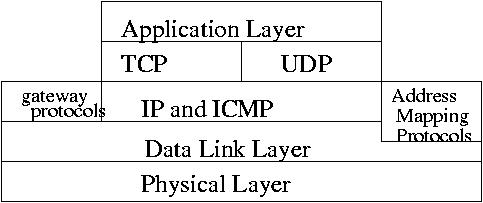
Five Layer protocol stack:
Application Layer (telnet, ftp, http ...)
Transport Layer (TCP, UDP)
Internet Layer (IP addresses, subnets, routing)
Link Layer (Ethernet, PPP)
Physical Layer (NIC, hubs, switches, routers, cabling)
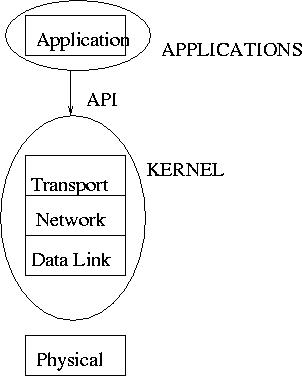
The Link layer, Internet layer and Transport layer are implemented
through kernel.
A) Link Layer Protocols.
Provides Datagram (data) delivery between hosts physically connected
via cables, hubs and switches (physical layer components).
Ethernet protocol.
- Packet collisions.
- Ethernet packet (simplified):
| Header |
Data Field (IP protocol data) |
The header (14 b): MAC addresses of the destination and source, type field
for the network layer.
- MAC address (6 bytes): 00:60:08:CA:39:C3 - the first 3 bytes identify
the vendor
- Address Resolution Protocol (ARP): relates IP to MAC for the local hosts:
/sbin/arp -a
? (192.168.5.240) at 08:00:20:1A:FD:43 [ether] on eth0
B) Network Layer Protocols
It provides IP addressing, subnets, IP routing and packet filtering.
- The IP layer packet:
| IP Header |
Data Field (Transport protocol data) |
- IP Address classes
(considering IPv4):
Class The First byte Network/Host Addr.
------------------------------------------------
A 0-127 N.H.H.H
B 128-191 N.N.H.H
C 192-223 N.N.N.H
D 224-239 (multicast)
E 240-247 (experimental)
-----------------------------------------------
- Host IP address, Subnet mask, and the Network address.
Decimal Binary
-------------------------------------------------------------------
Host: 192.168.5.10 11000000 10010100 00000101 00001010
Nemask: 255.255.255.0 11111111 11111111 11111111 00000000
Network: 192.168.5.0 11000000 10010100 00000101 00000000
------------------------------------------------------------------
Router (gateway) address should be on the same subnet.
Broadcast address: 192.168.5.255 (the last address on the subnet)
Non-routable subnets:
10.0.0.0
172.(16-31).0.0
192.168.(0-255).0
- Packet Routing
Unisys machines (no routing):
[unisys14]# netstat -nr
Kernel IP routing table
Destination Gateway Genmask Flags MSS Window irtt Iface
192.168.5.0 0.0.0.0 255.255.255.0 U 40 0 0 eth0
127.0.0.0 0.0.0.0 255.0.0.0 U 40 0 0 lo
0.0.0.0 192.168.5.240 0.0.0.0 UG 40 0 0 eth0
Our firewall, capone (routing between 192.168.5.0 and 128.6.238.64):
[alexei@capone alexei]$ netstat -nr
Kernel IP routing table
Destination Gateway Genmask Flags MSS Window irtt Iface
128.6.238.64 0.0.0.0 255.255.255.240 U 0 0 0 eth0
192.168.5.0 0.0.0.0 255.255.255.0 U 0 0 0 eth1
127.0.0.0 0.0.0.0 255.0.0.0 U 0 0 0 lo
0.0.0.0 128.6.238.65 0.0.0.0 UG 0 0 0 eth0
- To enable routing:
echo 1 > /proc/sys/net/ipv4/ip_forward
or in /etc/sysctl.conf, put
net.ipv4.ip_forward = 1
- The local loopback device.
IP addr: 127.0.0.1 mask: 255.0.0.0
Anything sent to 127.0.0.1 on the same local host stays on the local host:
IP transmit ---> Local Loopback ---> IP recieve
- Network Address Translation (NAT) and
IP masquerading.
NAT is a method for mapping a private internal address space to a routable
internet IP address.
Example:
(Unisys hosts eth0) -------> (capone eth1: 192.168.5.240 -- local)
(capone eth0: 128.6.238.69 -- external) --------> Internet
Internet -------> capone
-- ICMP Internet Control Message Protocol.
Diagnostics of connections;
Status reporting of datagram processing;
Error reporting.
C) Transport Layer Protocols
Delivers packets from and to the applications and provides diagnostic
information about the connection between hosts on the network.
| TCP/UDP header |
Application data |
Protocols TCP and UDP act as port managers for user applications.
- Ports, listed etc/services:
tcpmux 1/tcp # TCP port service multiplexer
tcpmux 1/udp # TCP port service multiplexer
rje 5/tcp # Remote Job Entry
rje 5/udp # Remote Job Entry
echo 7/tcp
echo 7/udp
discard 9/tcp sink null
discard 9/udp sink null
systat 11/tcp users
systat 11/udp users
daytime 13/tcp
daytime 13/udp
qotd 17/tcp quote
qotd 17/udp quote
msp 18/tcp # message send protocol
msp 18/udp # message send protocol
chargen 19/tcp ttytst source
chargen 19/udp ttytst source
ftp-data 20/tcp
ftp-data 20/udp
ftp 21/tcp
ftp 21/udp
ssh 22/tcp # SSH Remote Login Protocol
.............................
.............................
Ports under 1024 are privileged ports.
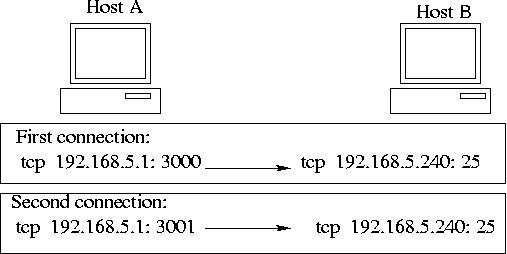
- Socket = Port + IP address.
Any new connection opens a new socket.
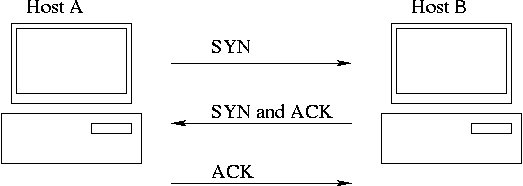
- TCP session between hosts "A" and "B"
The three-step handshake:
Transfer. Retransmit if no ACK returned.
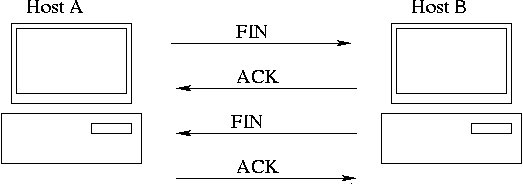
Detachment:
- UDP
No session and acknowledgement on data receive;
high bandwidth.
D) Application Layer Protocols
Applications are running either as stand alone daemons
or started through application servers such as inetd or xinetd.
- xinetd
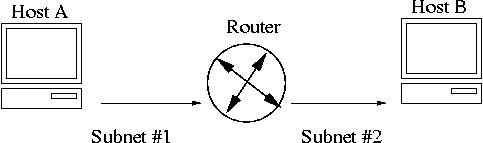
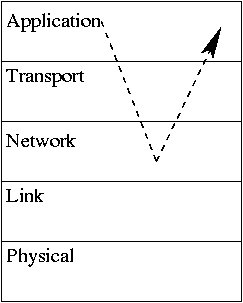
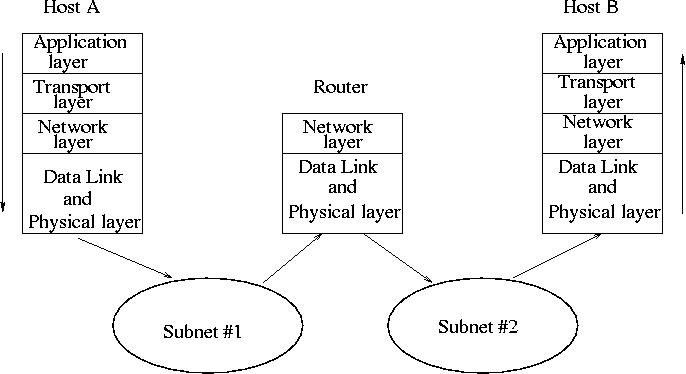
Putting it all together (Host A -- Host B communication):
II. Configuring Linux on a network.
Configuring the network interface and routing.
A) Using commands /sbin/ifconfig and /sbin/route
Check the interface configuration:
/sbin/ifconfig
Check the routing configuration:
/sbin/route -n
or
netstat -nr
Stop the interface:
/sbin/ifconfig eth0 down
or
/sbin/ifdown eth0
Configure the interface:
/sbin/ifconfig eth0 192.168.5.240 netmask 255.255.255.0 up
Configure the routing to the gateway:
/sbin/route add default gw 192.168.5.240 eth0
B) Using the startup scripts.
Static IP address configuration:
/etc/sysconfig/network
NETWORKING=yes
HOSTNAME=unisys14.rutgers.edu
GATEWAY=192.168.5.240
/etc/sysconfig/network-scripts/ifcfg-eth0
DEVICE=eth0
BOOTPROTO=static
IPADDR=192.168.5.14
NETMASK=255.255.255.0
ONBOOT=yes
Dynamic (DHCP) configuration:
/etc/sysconfig/network
NETWORKING=yes
HOSTNAME=localhost.localdomain
/etc/sysconfig/network-scripts/ifcfg-eth0
DEVICE=eth0
BOOTPROTO=dhcp
ONBOOT=yes
C)Using /usr/sbin/redhat-config-network-gui
D) Using /usr/sbin/redhat-config-network-druid
For the name resolution, configure
/etc/hosts, /etc/resolv.conf, /etc/nsswitch.conf
Assignment due by 02/11/2004
1. ARP command:
/sbin/arp -a
/sbin/arp -d [list all IP-addresses]
/sbin/arp -a
ping unisys01
ping capone
ping engsoft
/sbin/arp -a
Every time when you are trying to access any remote machine via TCP/IP,
your ARP cash gets updated first, then the MAC address of the remote host,
or the gateway if the host is located outside of your subnet,
is used to deliver the ethernet frame.
2. traceroute command:
/usr/sbin/traceroute engsoft
/usr/sbin/traceroute eden
This shows you all the gateways between the subnets your packet
travels towards the destination (engsoft for example).
3. Re-configure your network interface for network 192.5.1.0/24 using ifconfig
command. If you are on unisys04 machine, for example:
/sbin/ifconfig eth0 192.5.1.4 netmask 255.255.255.0 up
Ask your neighbor to reconfigure his machine on the same network (192.5.1.0/24 );
try to ping each other machines. Make sure you are using different
IP addresses on the same subnet. Try to ping any machine on the original
subnet, 192.168.5.0/24 As you understand, there is no routing set between
subnets 192.5.1.0/24 and 192.168.5.0/24 so you can't pass network packets between
them.
Do the same network re-configuration using the network scipt files.
Finally, configure your machine for the original network settings.
4. Create a kickstart boot floppy for the rack-mount cluster machines:
mount -t nfs 192.168.5.250:/usr/src/files/pub/cd90 /mnt/nfs
cd /mnt/nfs/images
dd if=unisys_bdisk_nodes.img of=/dev/fd0 bs=1440k count=1
This floppy will allow you to run unattended kickstart installation on
any machine in Unisys lab.
Plug the floppy in your rack-mount cluster node. Pick up a node with the same
number as your unisys desktop. For example if you are on unisys04,
use node04. Power-up the rack-mount cluster node. The kickstart
installation will run on its own and notifies you with 5 bips when finishes.
Remove the floppy and reboot the node by pressing on 'reset' red button.
The node should be accessible through the network when it boots up.
Include the IP address of the node and its name in your /etc/hosts file
on your desktop, for example,
192.168.5.21 node01
The IP addresses run from 192.168.5.21 to 192.168.5.36 for node01 to node16,
accordingly.
ssh to the node as root (you know the root password):
ssh root@node01
Create a user account for yourself; give yourself a password.
Configure your cluster machine as a telnet server. Telnet servers listen on
port 23 and start telnetd service through inetd/xinetd when there is a request for it.
Install the xinetd RPM if it is not yet
installed (get the RPM from 192.168.5.250:/usr/src/cd90 as you did at
the previous practical session);
install the telnet-server RPM; enable telnet
in the configuration file /etc/xinetd.d/telnet
modifying the entry
disable = no
re-start the xinetd daemon as follows:
/etc/rc.d/init.d/xinetd stop
/etc/rc.d/init.d/xinetd start
Try to telnet to your cluster machine as yourself.
Run command netstat -na | less , and notice if there
is an entry with listening on port 23:
tcp 0 0 0.0.0.0:23 0.0.0.0:* LISTEN
Check what tcp port 23 means in /etc/services.
To disable telnet, modify /etc/xinetd.d/telnet
making the entry disable = yes and re-start the xinetd daemon:
/etc/rc.d/init.d/xinetd stop
/etc/rc.d/init.d/xinetd start
Run netstat -na | less and see if your system
is still listening on port 23. Try to telnet to your machine again.
Your telnet service should be disabled now.
Note, you can disable and enable telnet using chkconfig command:
/sbin/chkconfig telnet off
/sbin/chkconfig telnet on
Then don't forget to restart xinetd.
5. Configure your machine as rlogin and rsh server following the procedure
similar to that in #4.
If you want to allow rsh/rlogin from certain hosts without providing a user
password, create a file /etc/hosts.equiv with the list of IP addresses (or the
hosts names), one on a line. For example,
localhost
unisysXX
Where unisysXX is the name of your desktop machine. Note, it is already
listed in /etc/hosts file on the rack-mount node.
Run rsh (remote shell) command on node01, for example:
rsh node01 "uname -a"
Run rcp command to copy files between the nodes. For example, to copy
files from directory /etc/hosts on node01 to your current directory:
rcp node01:/etc/hosts .
Make sure you see this file in you directory.
Create a new file in your home directory and rcp it to node01:
touch somef.txt
rcp somef.txt node01:/home/$USER
or
rcp somef.txt node01:~/.ssh/authorized_keys
Then rsh to node01 and make sure you see the file there.
Note, the services in #4 --#5 are
suggested as exercises only. Avoid using telnet,
rsh/rlogin and ftp on open network. These services
are voulnerable to hacker attacks.
Use SSH instead of them.
6. Configure SSH.
OpenSSH comes with Red Had 9.0 installation in packages
openssh
openssh-server
openssh-clients
Make sure they are installed on your desktop and the cluster node running
rpm -qa | grep ssh
For SSH authentication, you can use either RSA or DSA keys besides password.
Generate RSA keys:
To generate a RSA key pair to work with version 2 of the protocol,
type the following command at a shell prompt:
ssh-keygen -t rsa
Accept the default file location of ~/.ssh/id_rsa. Enter a passphrase
different from your account password and confirm it by entering it again.
The public key is written to ~/.ssh/id_rsa.pub. The private key is
written to ~/.ssh/id_rsa. Never distribute your private key to anyone.
Change the permissions of your .ssh directory using the command
chmod 755 ~/.ssh. Note, you have to have this directory with 755
permission on both hosts.
Copy the contents of ~/.ssh/id_rsa.pub to ~/.ssh/authorized_keys on
the machine to which you want to connect, for example, using rcp
as in the previous exercise. If the file
~/.ssh/authorized_keys does not exist, you can copy the file
~/.ssh/id_rsa.pub to the file ~/.ssh/authorized_keys on the other
machine.
Try to ssh to the node.
Generate DSA keys.
To generate a DSA key pair to work with version 2 of the protocol,
type the following command at a shell prompt:
ssh-keygen -t dsa
Accept the default file location of ~/.ssh/id_dsa. Enter a passphrase
different from your account password and confirm it by entering it again.
The public key is written to ~/.ssh/id_dsa.pub. The private key is
written to ~/.ssh/id_dsa. It is important never to give anyone the
private key.
Copy the contents of ~/.ssh/id_dsa.pub to ~/.ssh/authorized_keys on the
machine to which you want to connect. If the file ~/.ssh/authorized_keys
does not exist, you can copy the file ~/.ssh/id_dsa.pub to the
file ~/.ssh/authorized_keys on the other machine.
Try to ssh to the node. Note, if you haven't provided password when
generating DSA or RSA keys, you would be able to login without a
passfrase. If you want to ssh to the node from the other hosts, you
would need to generate the client RSA or DSA keys and add them to
~/.ssh/authorized_keys on the node.
The ssh-agent can be used to store your passphrase so that you do
not have to enter it each time you make a ssh or scp connection.
At a shell prompt, type the following command:
exec /usr/bin/ssh-agent $SHELL
Then type the command:
ssh-add
and enter your passphrase(s). If you have more than one key pair
configured, you will be prompted for each one.
When you log out, your passphrase(s) will be forgotten. You must
execute these two commands each time you log in to a virtual console
or open a terminal window.
Run a remote command over ssh, for example:
ssh node01 "uname -a"
Copy files from your desktop to the node and vise versa using scp command
as you already did in exercise #5 with rcp:
scp node01:/etc/hosts .
touch somef.txt
scp somef.txt node01:/home/$USER
7. Syncronizing directories between remote hosts using rsync.
Rsync is a very useful alternative to rcp. This tool lets you copy files
and directories between a local host and a remote host using either rsh
or ssh.
Make sure that rsync is installed on both your tesktop and the node:
rpm -qa | grep rsync
Creat a directory tree and copy it over to the node with rsync command:
mkdir -p dir1/dir2/dir3
rsync -avz dir1 node01:/home/$USER
Option a stands for archive (preserve links and timestamps);
v is for verbose and z is for data compression when sending-receiving.
In the case above, rsync was running over rsh. Disable rsh on the node
changing "disable = no" for "disable = yes" in /etc/xinetd.d/rsh and
restarting xinetd, then try the same rsync again. It should hang up.
To run rsync over ssh, specify "-e ssh" option:
rsync -e ssh -avz dir1 node01:/home/$USER
In addition to using rcp/ssh for transport, you can also use Rsync itself,
in which case you will connect to TCP port 873, but it is beyond the scope of
this lecture.
When you finish, don't forget to execute
shutdown -h now
on the cluster machine to shutdown it.
8. Read Chapters 25--29