
Lecture 01/21/2003Introduction to the Course Instructor: Alexei Kotelnikov TA: Amit Freeman Recitation TA: Malik Khan Lucas Machado Paul Arias Diane Palla Objectives of the course
Lecture in EIT Lab (D-110):
|
Period |
Time |
Monday |
Tuesday |
Wednesday |
Thursday |
Friday |
| 1 | 8:10-09:30 | |||||
| 2 | 9:50-11:10 | |||||
| 3 | 11:30-12:50 | |||||
| 4 | 1:10-2:30 | |||||
| 5 | 2:50-4:10 | |||||
| 6 | 4:30-5:50 | |||||
| 7 | 6:10-7:30 | |||||
| 8 | 7:40-9:00 | |||||
| 9 | 9:10-10:30 |
Practical sessions in Unisys Lab:(D-112):
|
Period |
Time |
Monday |
Tuesday |
Wednesday |
Thursday |
Friday |
| 1 | 8:10-09:30 | |||||
| 2 | 9:50-11:10 | |||||
| 3 | 11:30-12:50 | |||||
| 4 | 1:10-2:30 | |||||
| 5 | 2:50-4:10 | |||||
| 6 | 4:30-5:50 | |||||
| 7 | 6:10-7:30 | |||||
| 8 | 7:40-9:00 | |||||
| 9 | 9:10-10:30 |
|
 |
 |
 |
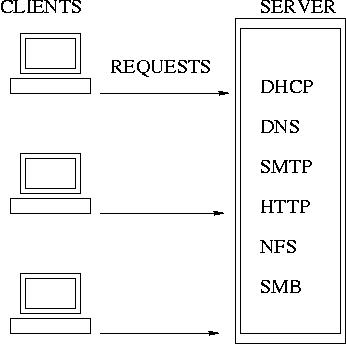
System Command Exercises from the Book- Chapter 4
I. Preface: brief introduction into Unix commands.
Unix system is based on files: commands, programs, configuration files, documents, etc.
Files in Unix have ownership (user, group, and others) and attributes:
The files ownership and attributes can be listed with command ls -l.
The ownership can be changed with command chown, the attributes can
be modified with chmod.
Executable system files are called system commands. Note, file names and
commands in Unix are case sensitive. Do not create files
with the names similar to the system commands, for example,
"test", "file".
When you login to a system, you get the shell, which provides you
with ability to execute commands interactively. You can also assemble
commands into so called shell scripts.
You can read about the main Unix commands in Chapter. 4 and
shell scripting in Chapter 7. Information about various commands, their
options and parameters can be obtained via command
man command_name (man pages) and
info command_name
If the command you want to run is located in one of the directories
listed in the PATH environmant variable, you just need to type its name and
press Enter key, otherwise, use the absolute or relative pathname, as
discussed in Section 4.6. You can use the
Tab key to complete typing the
command. For example, type "dme" and press the Tab key to get "dmesg".
Running commands are called processes. Each running process has a user ID, UID, process ID, PID, and process parent ID, PPID.
Processes can be viewed with command ps.
To see all running processes in the system, use ps -ef
or ps -aux.
Usually, the processes you start run with your UID. However, if there is
the SETUID bit set in a command file, the process would run with UID of
the file owner regardless of whoever starts it.
Most of the Unix system processes have three data streams:
II. Exercises with some system commands in Chapter 4.
Try to use the Tab key for command name completion. If you have any problems or questions during the exercises, ask the instructor or TA for help.
Directory Manipulation, Sec. 4.5
Standard Linux directory structure. The subdirectories of / :
1. Determine the directory you are in:
2. Go to some other directory, for example, /etc:
3. Go to your home directory:
The commands are listed in alphabetical order.
Read the section and try to run the following commands as follows:
bzip2 hosts.txt
bzip2 -d hosts.txt.bz2
Searching for files, Section 4.14
Become root and update the database:
Searching Within files, Section 4.15
You may see a lot of output from the standard error coming onto your screen. To suppress the standard error, you can re-direct it to /dev/null :
Try also re-direction of the standard output into a file:
grep -l unisys *
grep unisys /etc/hosts
cd ~
sleep 30
ps -ef > processes
grep sleep processes
Copy to MS-DOS and Windows Formatted floppy disks, Section 4.16
Ask the instructor or TA for a formatted PC floppy and complete Section 4.16 exercise. Try also commands mdeltree and mformat.
Archives and Backups, Section 4.17.
Create a new directory with subdirectories above your home directory, then tar and gzip it. For example,
cd ~
tar -cvf Newdir.tar Newdir
gzip Newdir.tar
ls -l Newdir.tar.gz
rm -R Newdir
cp Newdir.tar.gz /tmp
cd /tmp
gzip -d Newdir.tar.gz
tar -xvf Newdir.tar
To tar and gzip file with one command, try the following:
If you don't understand why it is unsecure having "." in your path, ask the instructor or TA to explain it to you.
III. Process ID; SETUID; sticky bit
SETUID files A) Login as yourself; copy /bin/sleep into your home directory cp /bin/sleep run ls -l on it and see who is its owner; run chmod 4755 sleep; become root, su; type whoami; run command ./sleep 20 & ; run ps -aux | grep sleep and see who is the owner of the process ./sleep B) Login as yourself and create a simple shell script, for example, ex1.x file: #!/bin/bash sleep 30 Then, chmod 4755 ex1.x; become root and execute the file: ./ex1.x ; run ps -aux | grep ex1.x to see who the process belongs to. C) Login as yourself and chmod 0755 ex1.x; then become a superuser and run the following command: su your_user_name -c "./ex1.x &" Where for your_user_name you substitute your user name. Then run ps -aux | grep ex1.x Who is the owner of the process? Sticky bit Login as root; cd /tmp create directory temp, mkdir temp; give it a world writable permissions, chmod 777 temp; go there, cd temp; create an empty file, touch ex3; login as yourself; cd /tmp/temp; remove the file ex3, rm ex3. As root, chmod 1777 temp go there, cd temp; create an empty file, touch ex3; login as yourself; cd /tmp/temp; remove the file ex3, rm ex3. Unremovable (immune) files Login as root; cd /tmp; create a new file, touch ex4; change its attributes,chattr +i ex4; try to remove the file, rm ex4; run lsattr ex4. What do you see? Note, chattr works with ext2 (native linux) file system only.